
ヘルプセンター
どのようにお手伝いできますか?

一般的なヘルプトピック
PrintKK AI Workflow Tutorial
AI Workflow is an AI automation workflow feature in the PrintKK Dashboard. You can use preset templates to automatically process an original image into a product design, and then continue generating AI product scene images.
Simply put, AI Workflow can help you complete the following process:
Original image → Image processing → Generate design → Generate mockup
“Image processing” can include steps such as image variation, pattern extraction, image upscaling, and background removal. With AI Workflow, you can reduce repetitive operations and generate product assets faster for listing, display, and marketing.
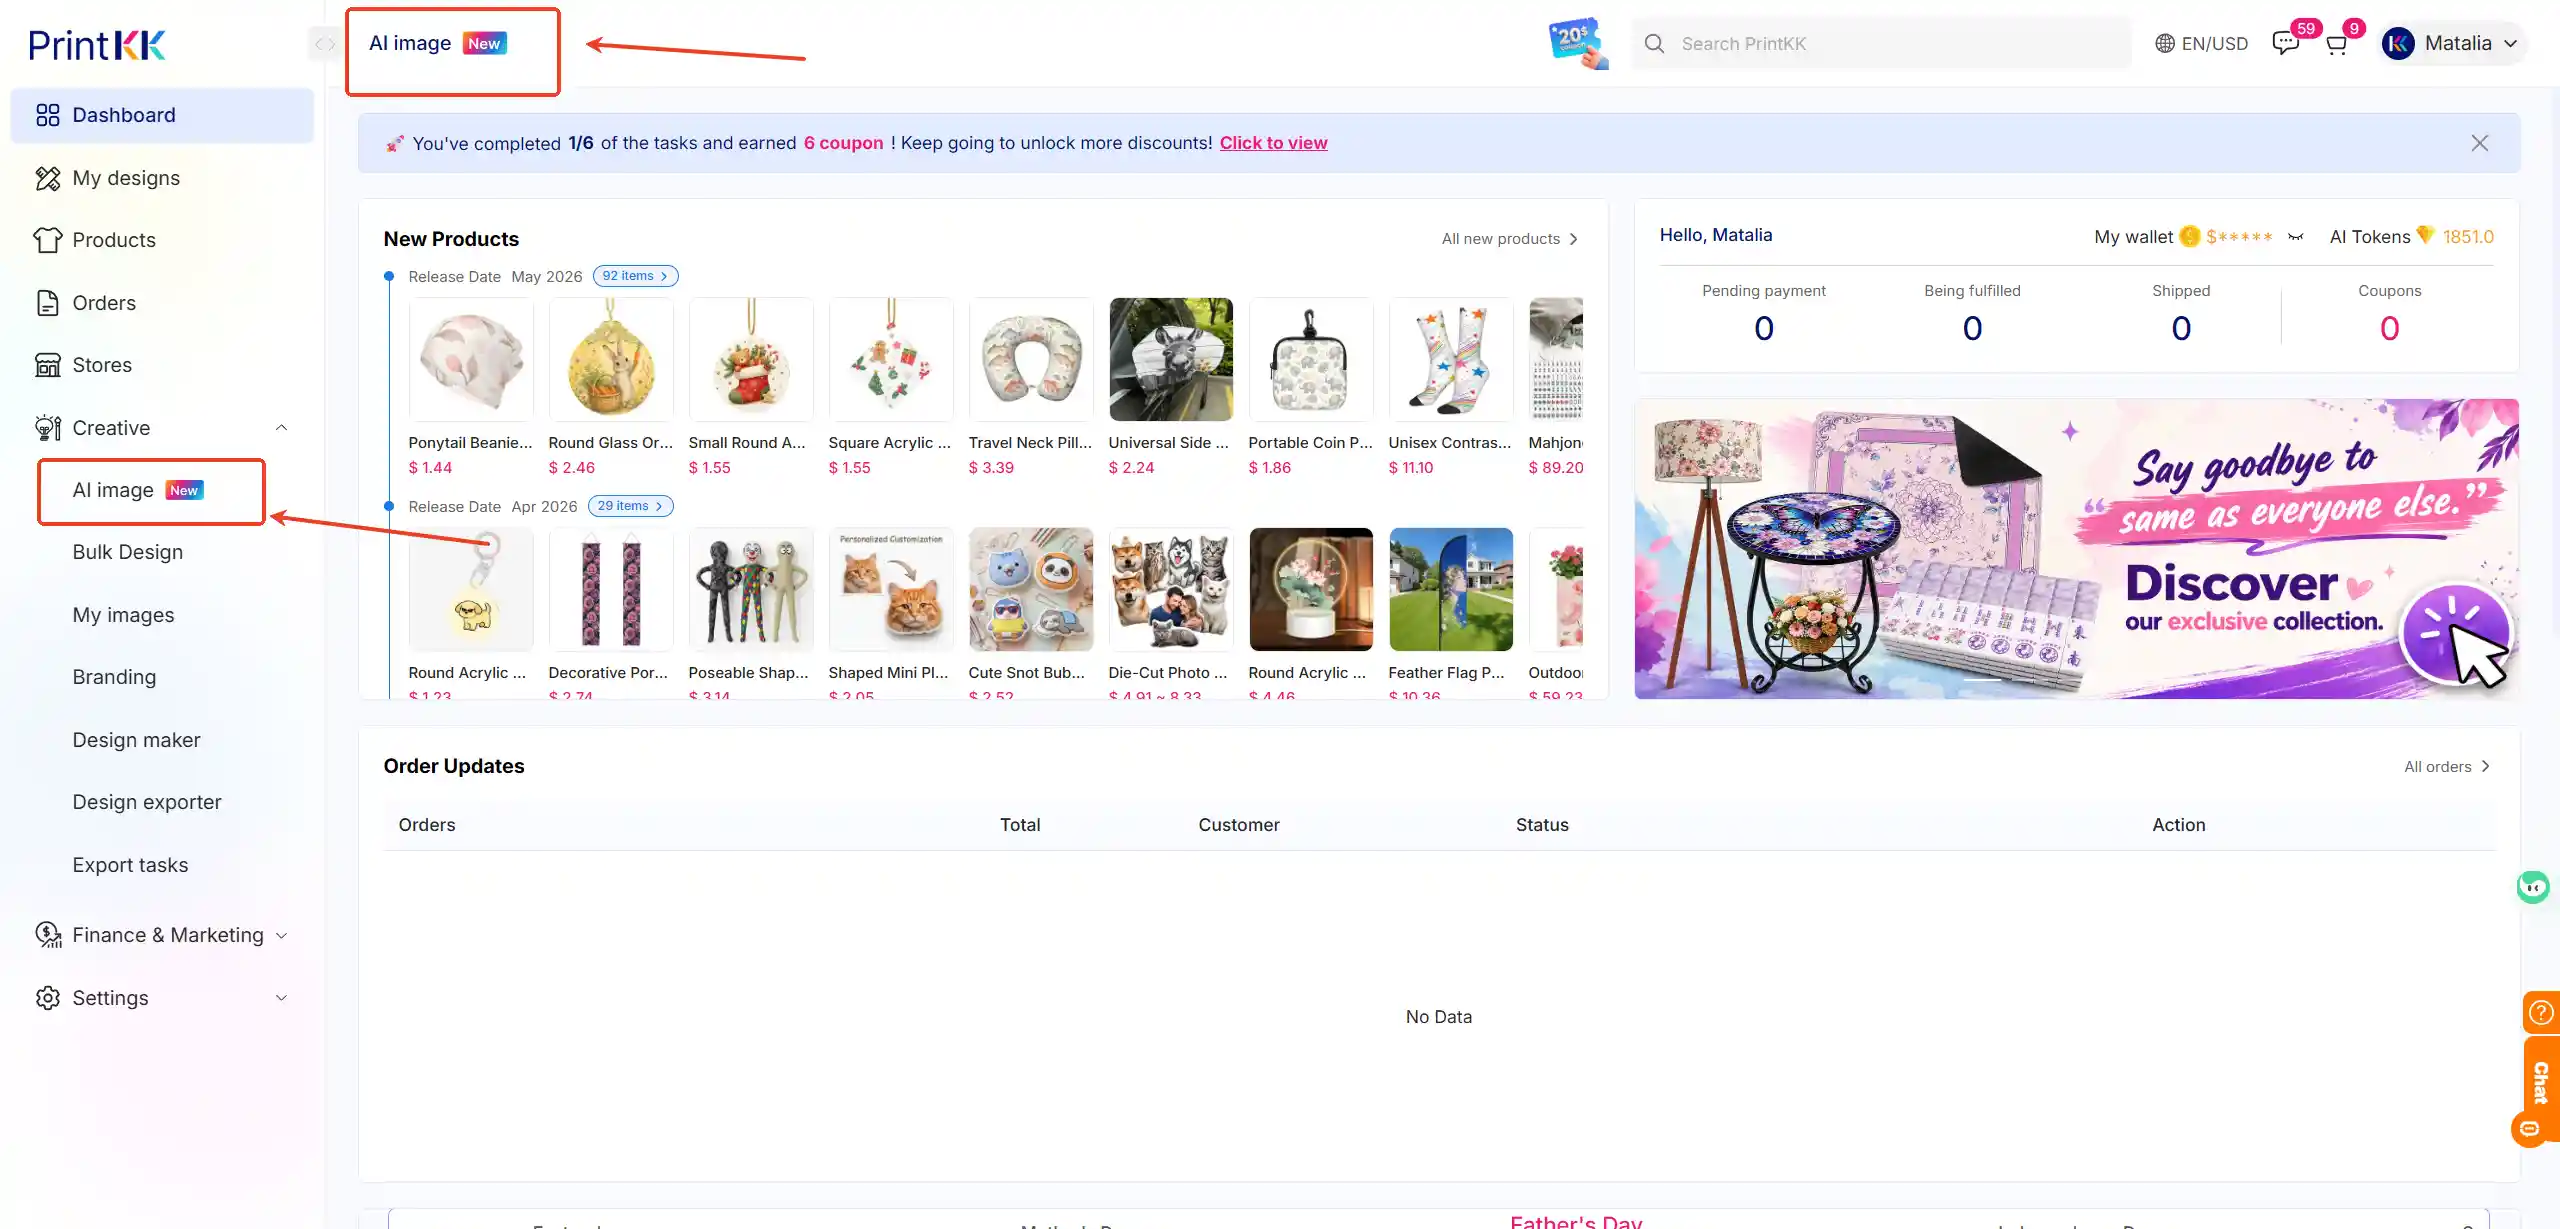
1. Where can I access AI Workflow?
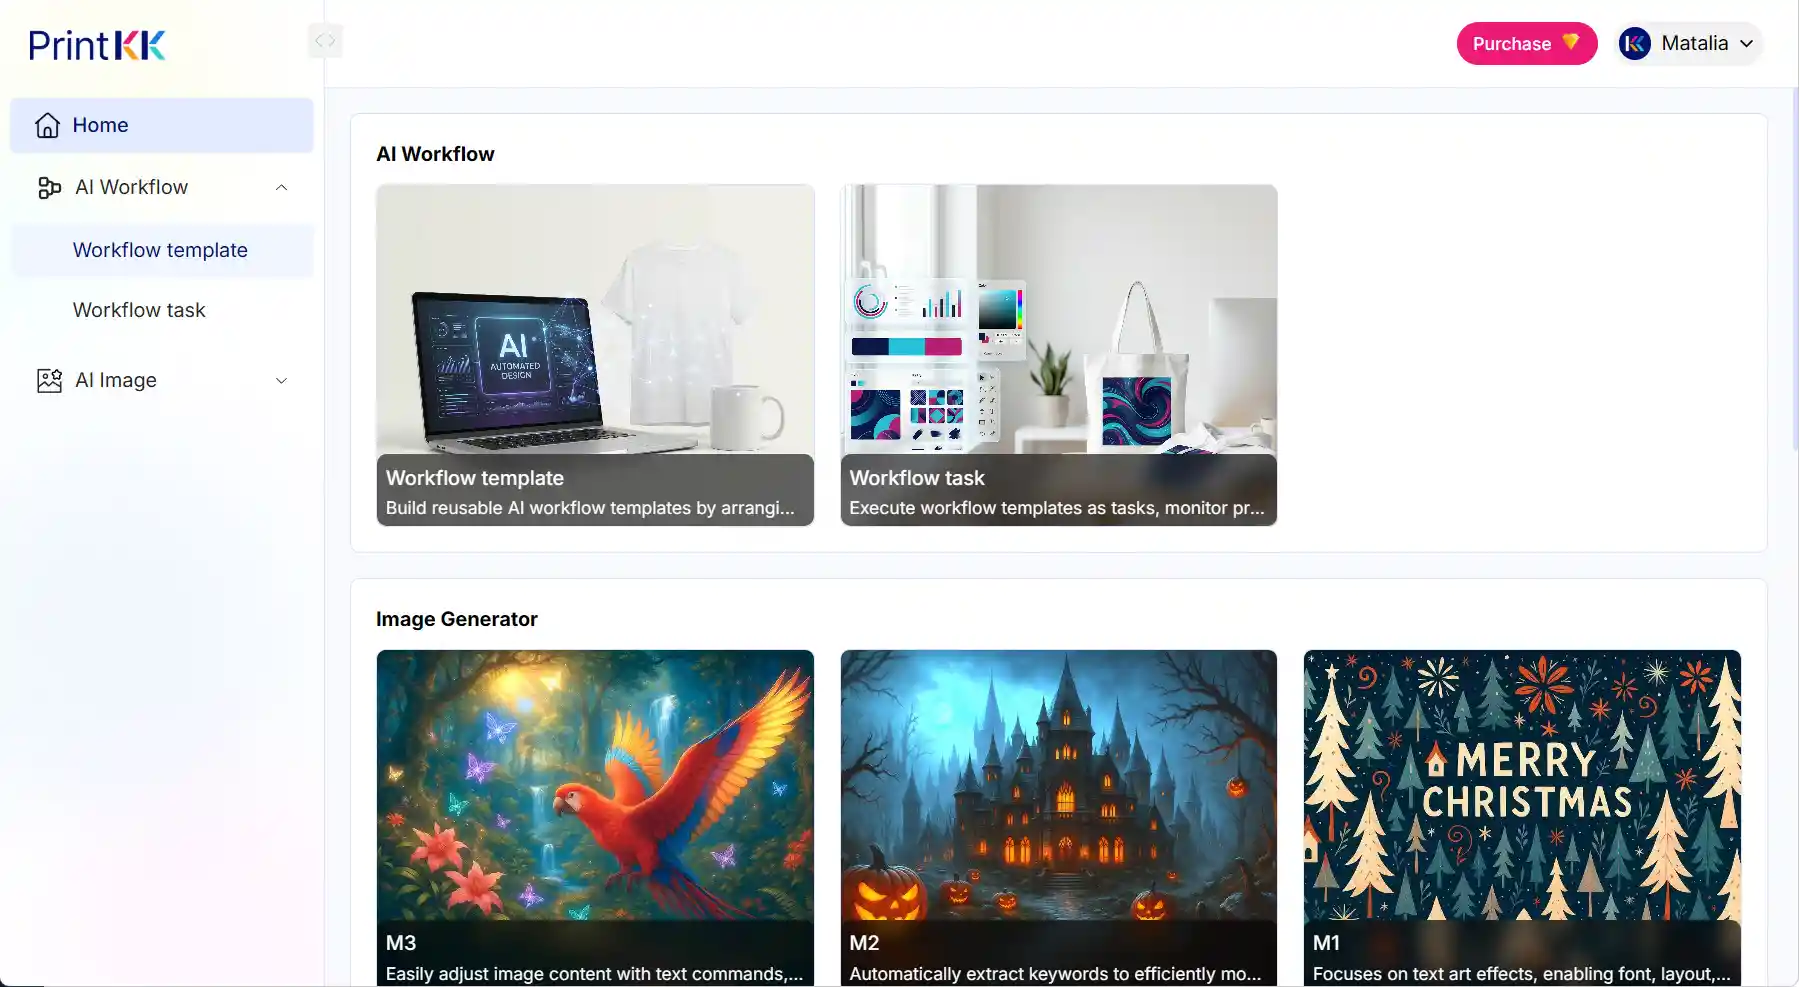
After logging in to the PrintKK Dashboard, find AI Workflow from the left sidebar or the homepage module.
AI Workflow mainly includes two pages:
If this is your first time using AI Workflow, we recommend starting from Workflow tasks and creating a task with an official template.
2. What can AI Workflow do?
AI Workflow can connect multiple AI generation steps and automatically complete a full generation process.
For example, a complete workflow can include:
- Extract the pattern
Extract patterns or prints from the original image. - Image to image
Generate new image variations based on the pattern generated in the previous step. - Upscale Image
Improve image clarity and prepare the image for later product design generation. - Generate design
Apply the processed pattern to a product and generate a product design. - Generate mockup
Generate AI product scene images or product display images based on the product design.
If a node has a Review label, it means the generated results from this step require manual review. The workflow will continue to the next step after the results are approved.
3.What is a Workflow Template?
A Workflow Template is a preset AI generation process.
You can think of it as an “automated generation plan.” The template determines which steps the task will run and which parameters will be used in each step.
For example, a complete official template can help you complete the following:
- Upload original images
- Extract patterns from the images
- Generate new image variations
- Upscale images or improve image quality
- Generate product designs
- Generate AI product scene images
- Review and save results
For first-time users, we recommend using Official template first. After you are familiar with the process, you can create your own custom template.
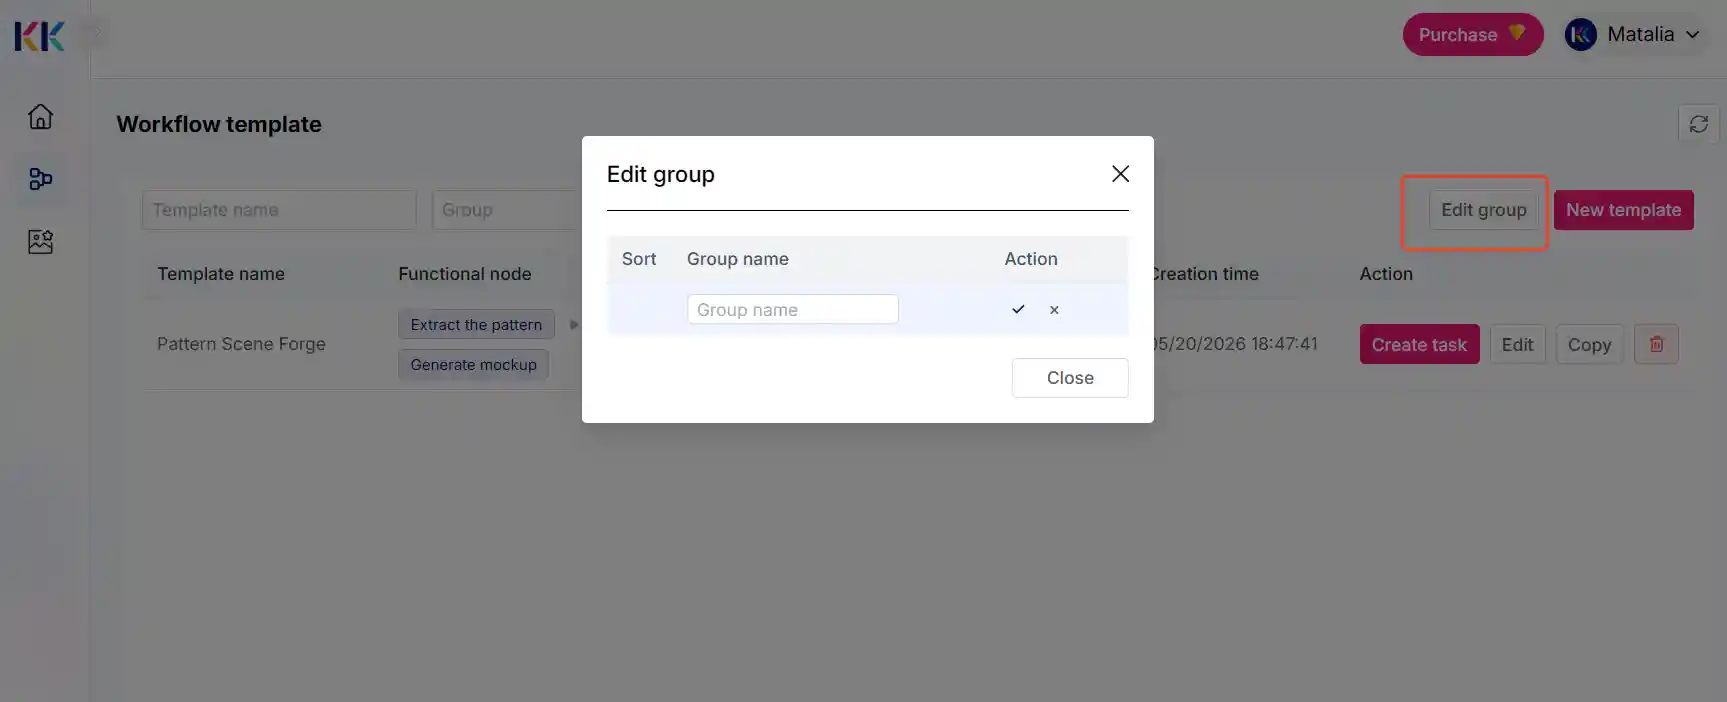
4. What is Edit group?
Edit group is used to manage workflow template groups.
When you create many templates later, groups can help you quickly find the templates you need. For example, you can create the following groups:
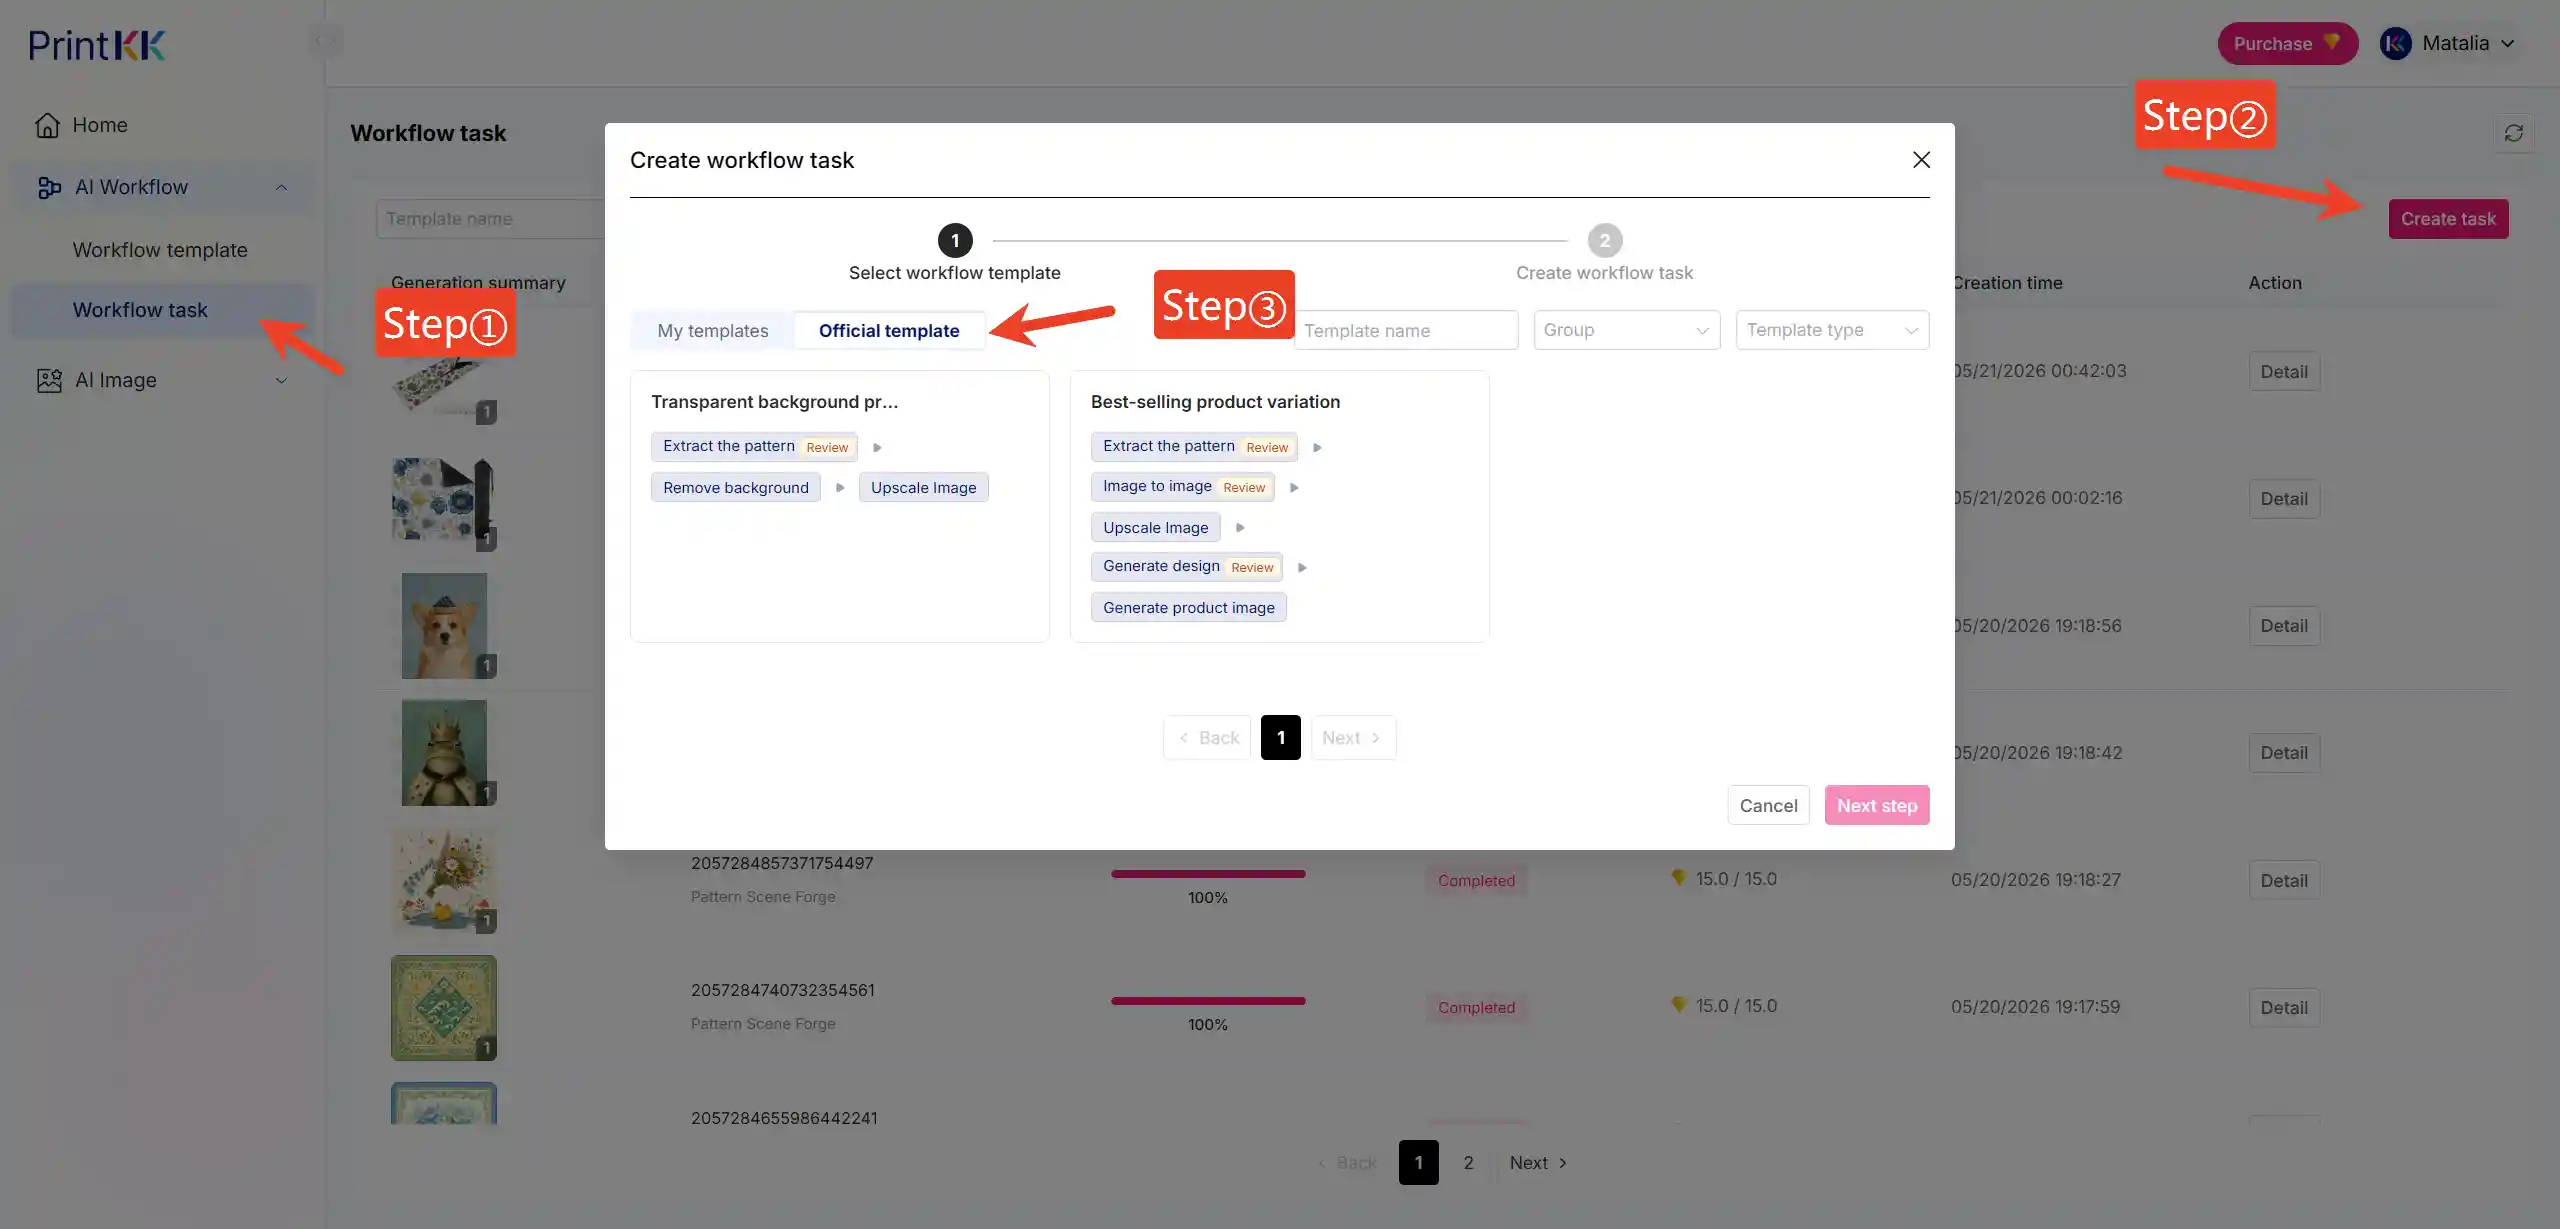
5. How to create a Workflow Task with an official template?
The following is the recommended way to use AI Workflow for the first time: create a task with an official template.
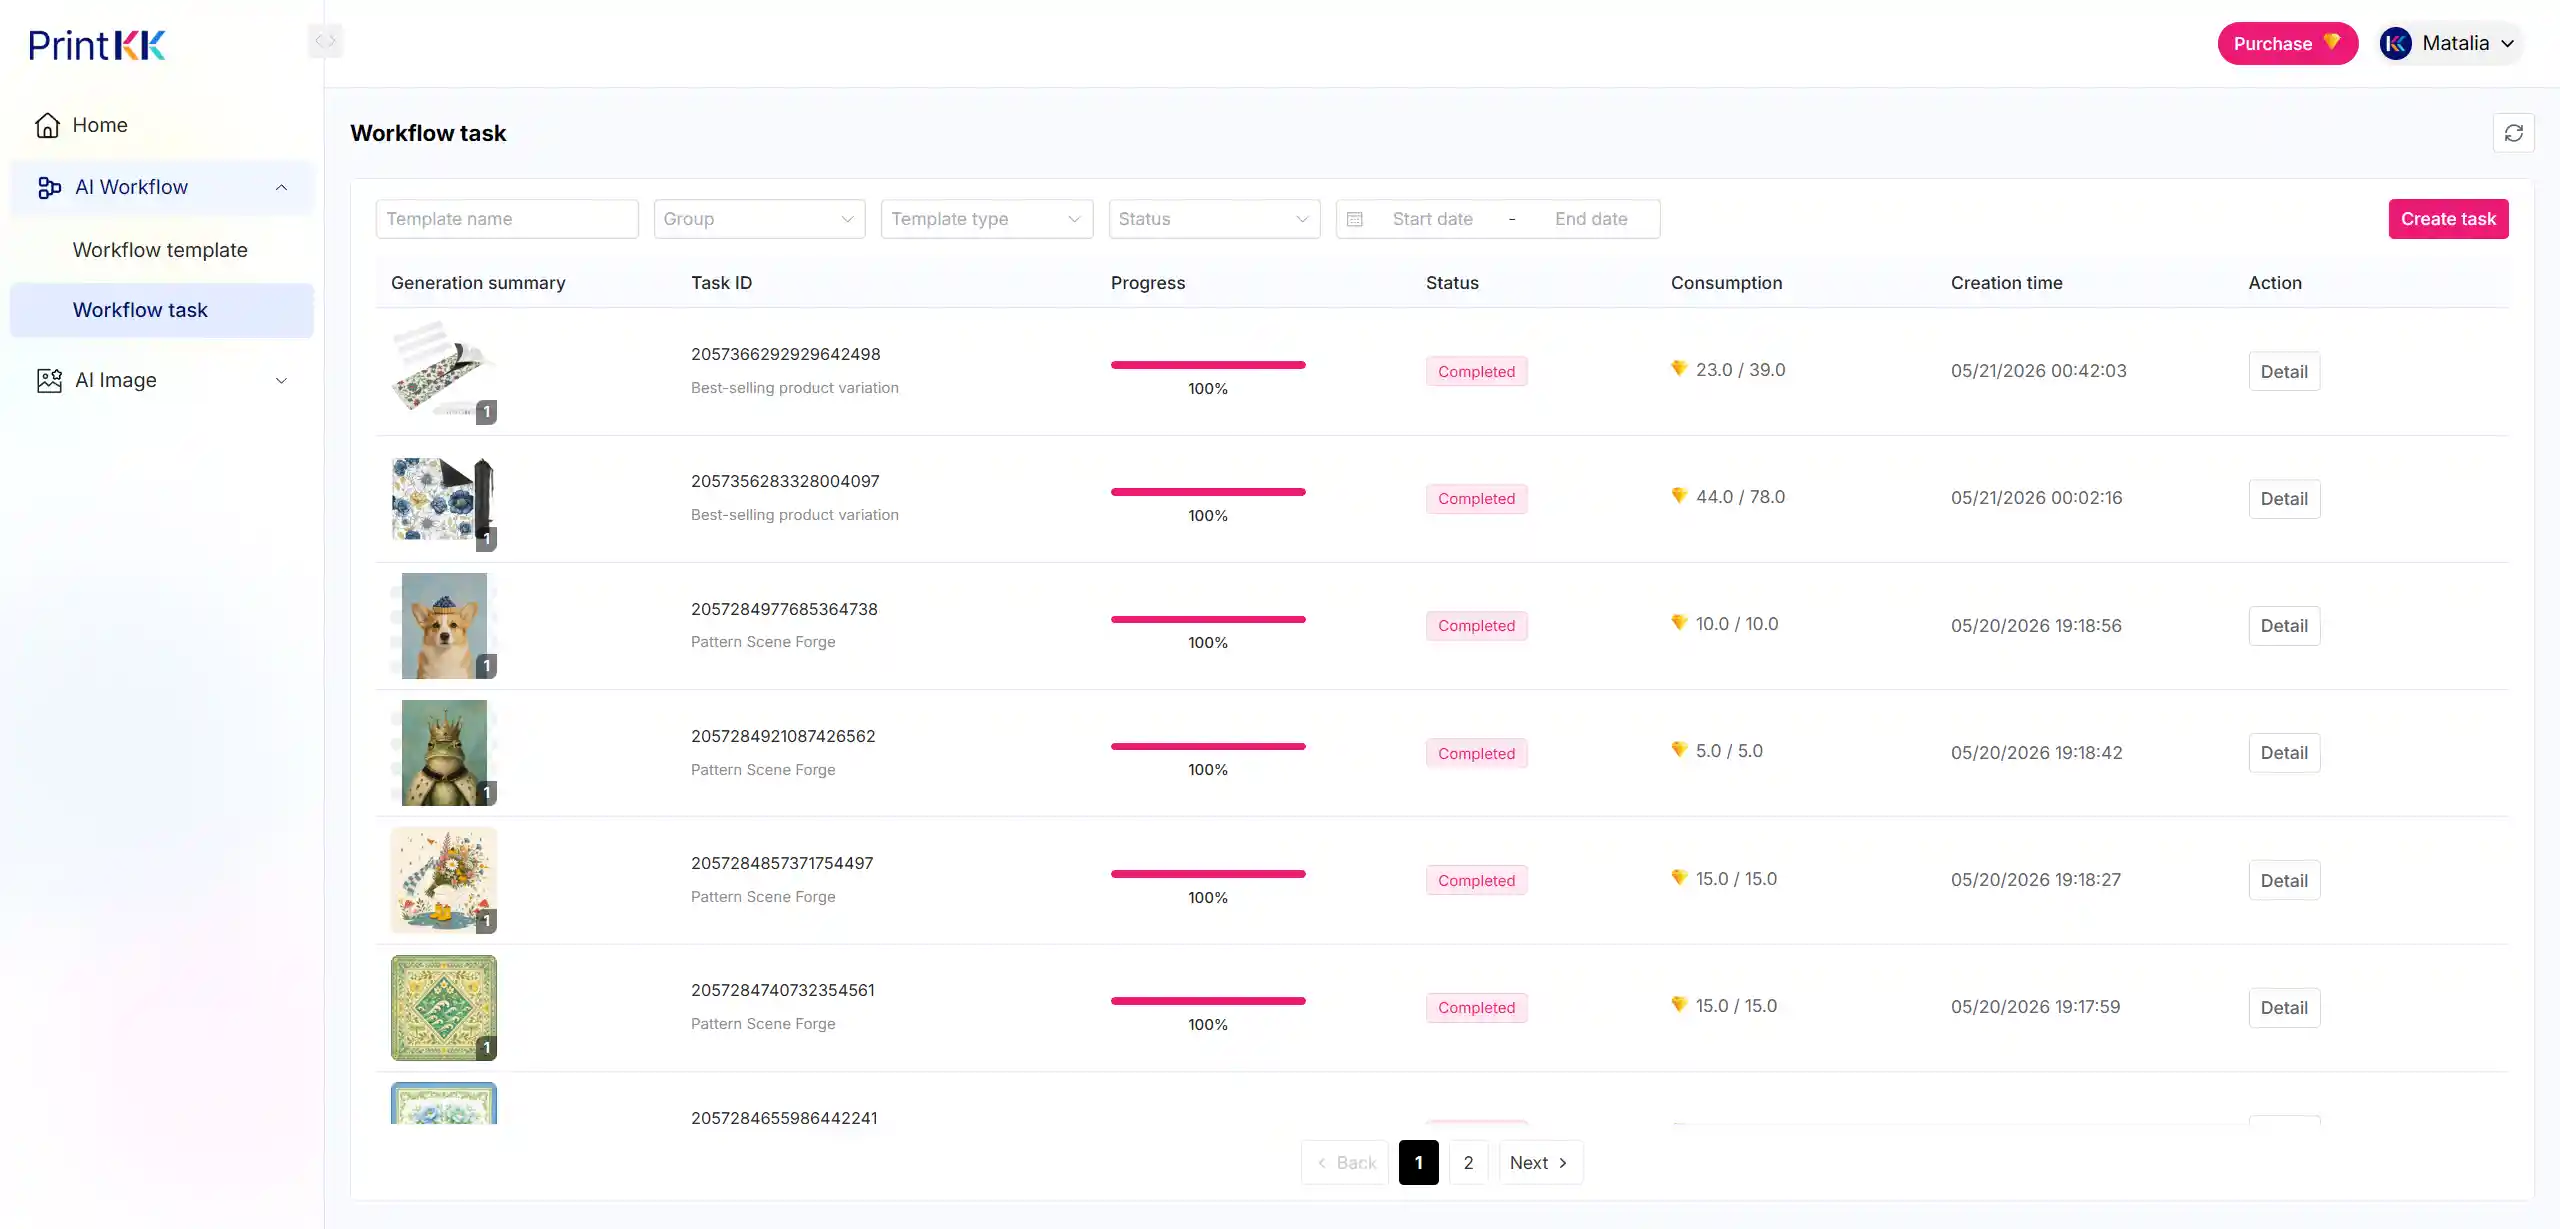
Step 1: Go to Workflow tasks
Click Workflow tasks in AI Workflow.
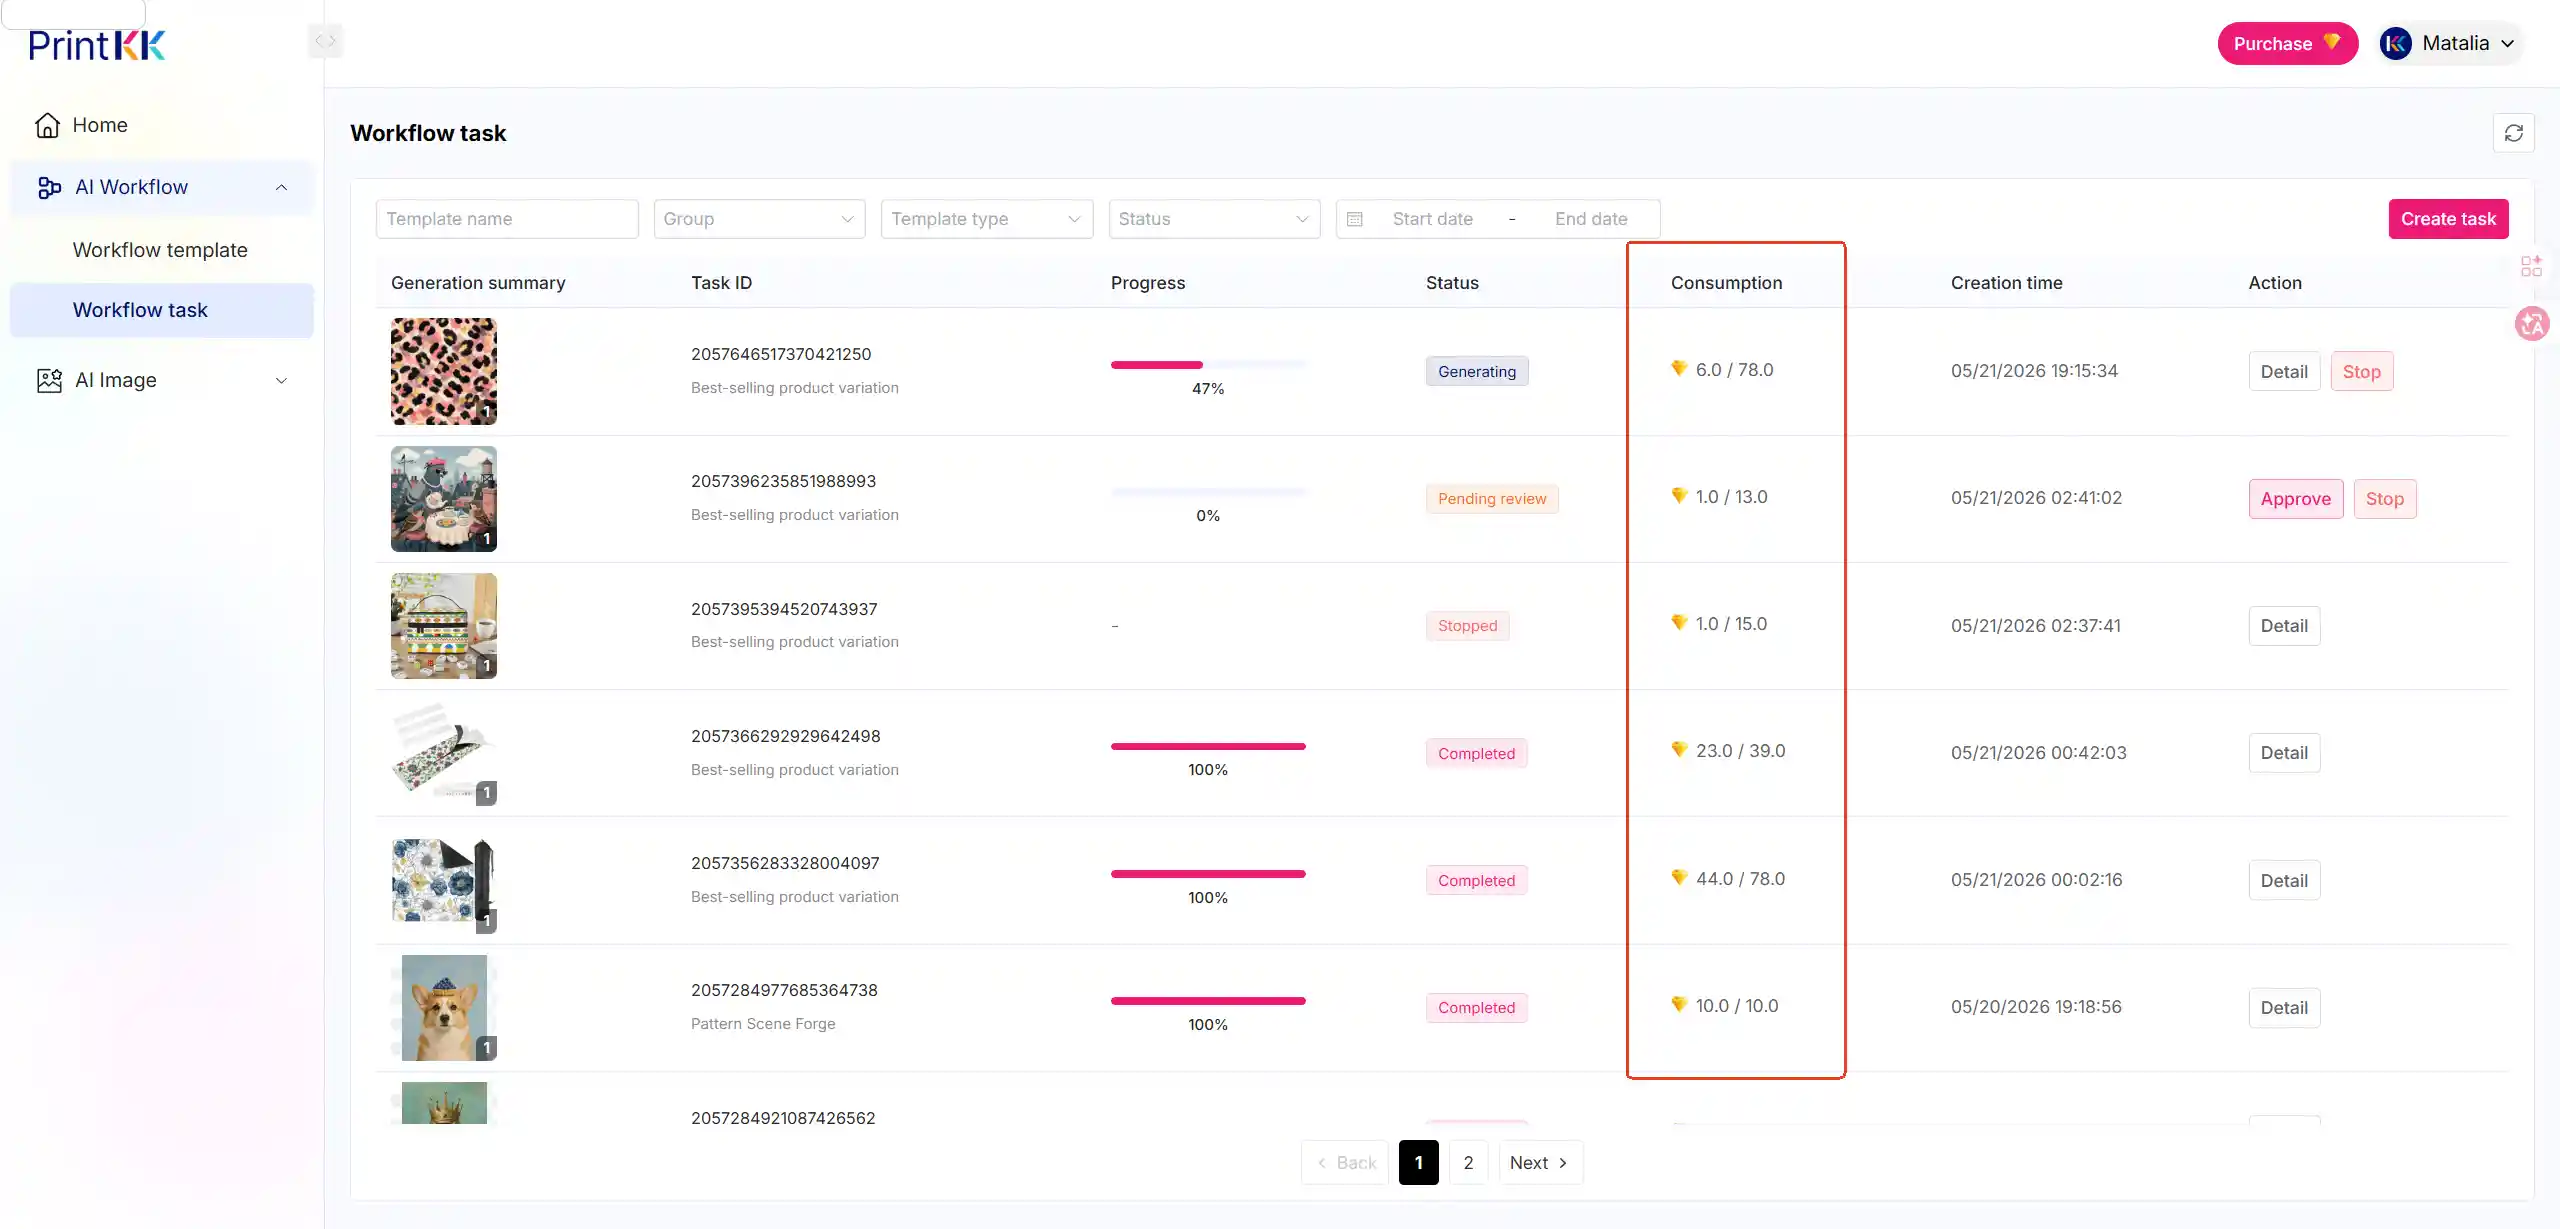
This page displays all workflow tasks, including task progress, status, Token consumption, and creation time.
Step 2: Click Create task
Click the Create task button on the page to start creating a new workflow task.
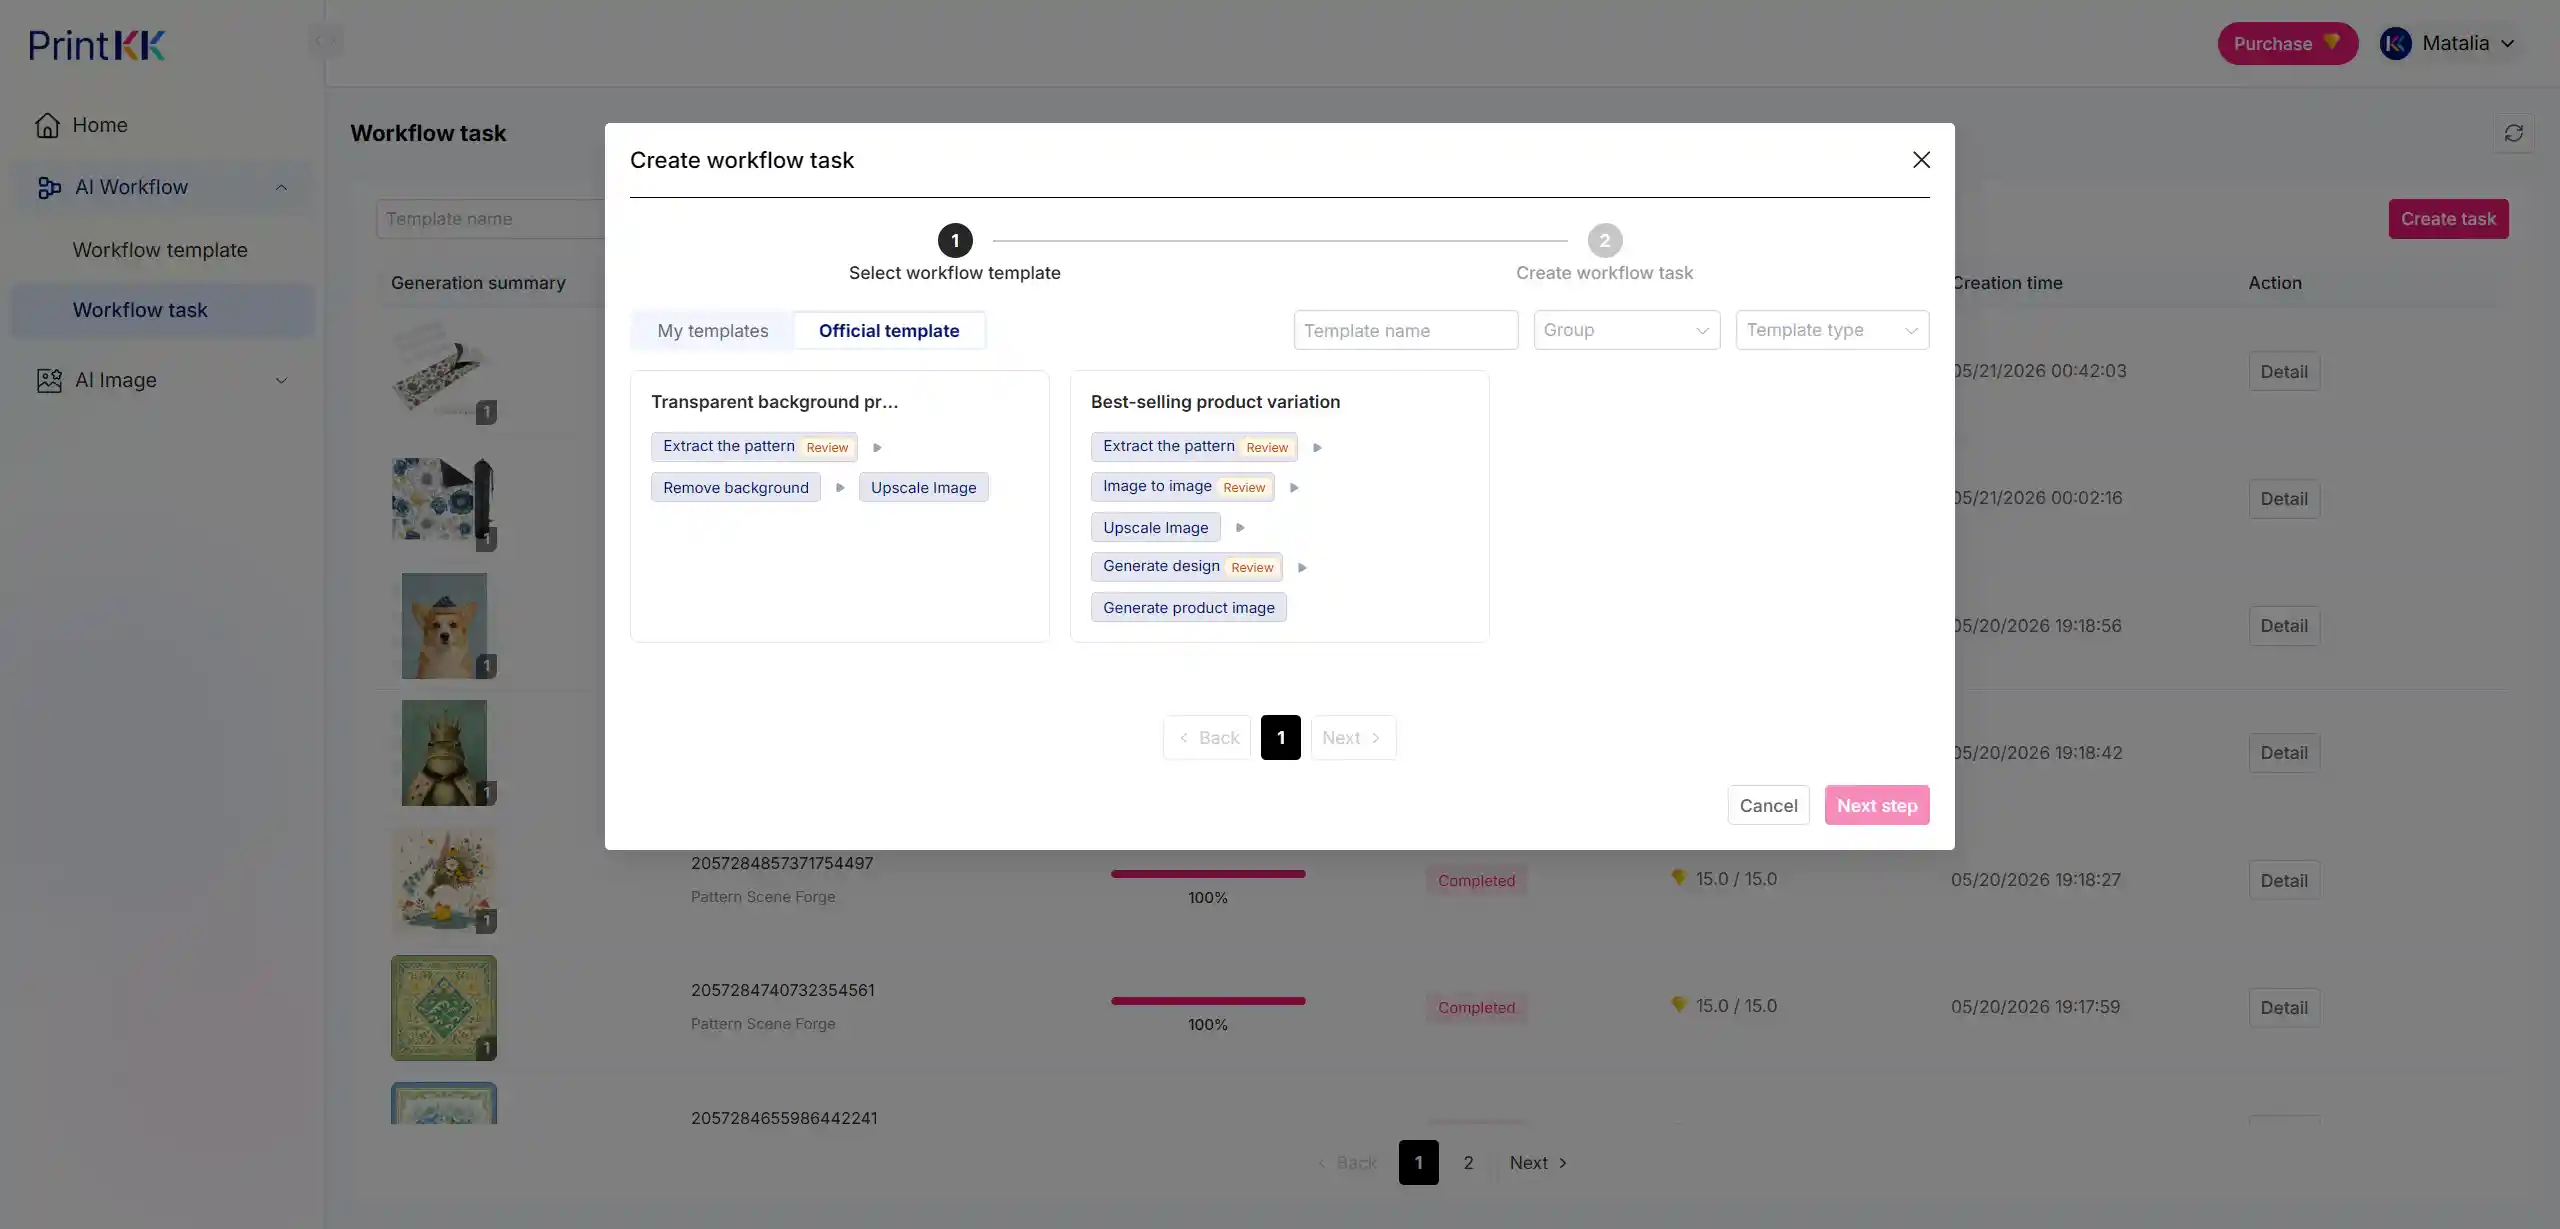
Step 3: Select an official template
After entering the Select workflow template page, select Official template.
Step 4: Confirm Template
After entering the Create workflow task page, first confirm the currently selected template.
If you need to change the template, click Reselect to select another one.
Step 5: Upload Original image
Select original images in the Original image area.
These images will be used as the input for the entire workflow. We recommend uploading images with clear patterns, obvious subjects, and content suitable for applying to products.
Step 6: Select Product
Select the product you want to generate a design for in the Product area.
If the workflow you selected includes the Generate mockup node, the system will automatically filter products that support AI product scene or mockup generation.
In other words, only eligible products will be displayed.
Step 7: Select product attributes
If the selected product has color or style attributes, the page will display:
Select attributes for product scene generation
You need to select the attributes that will be used to generate AI product scene images.
If the product does not have related attributes, this field may not be displayed.
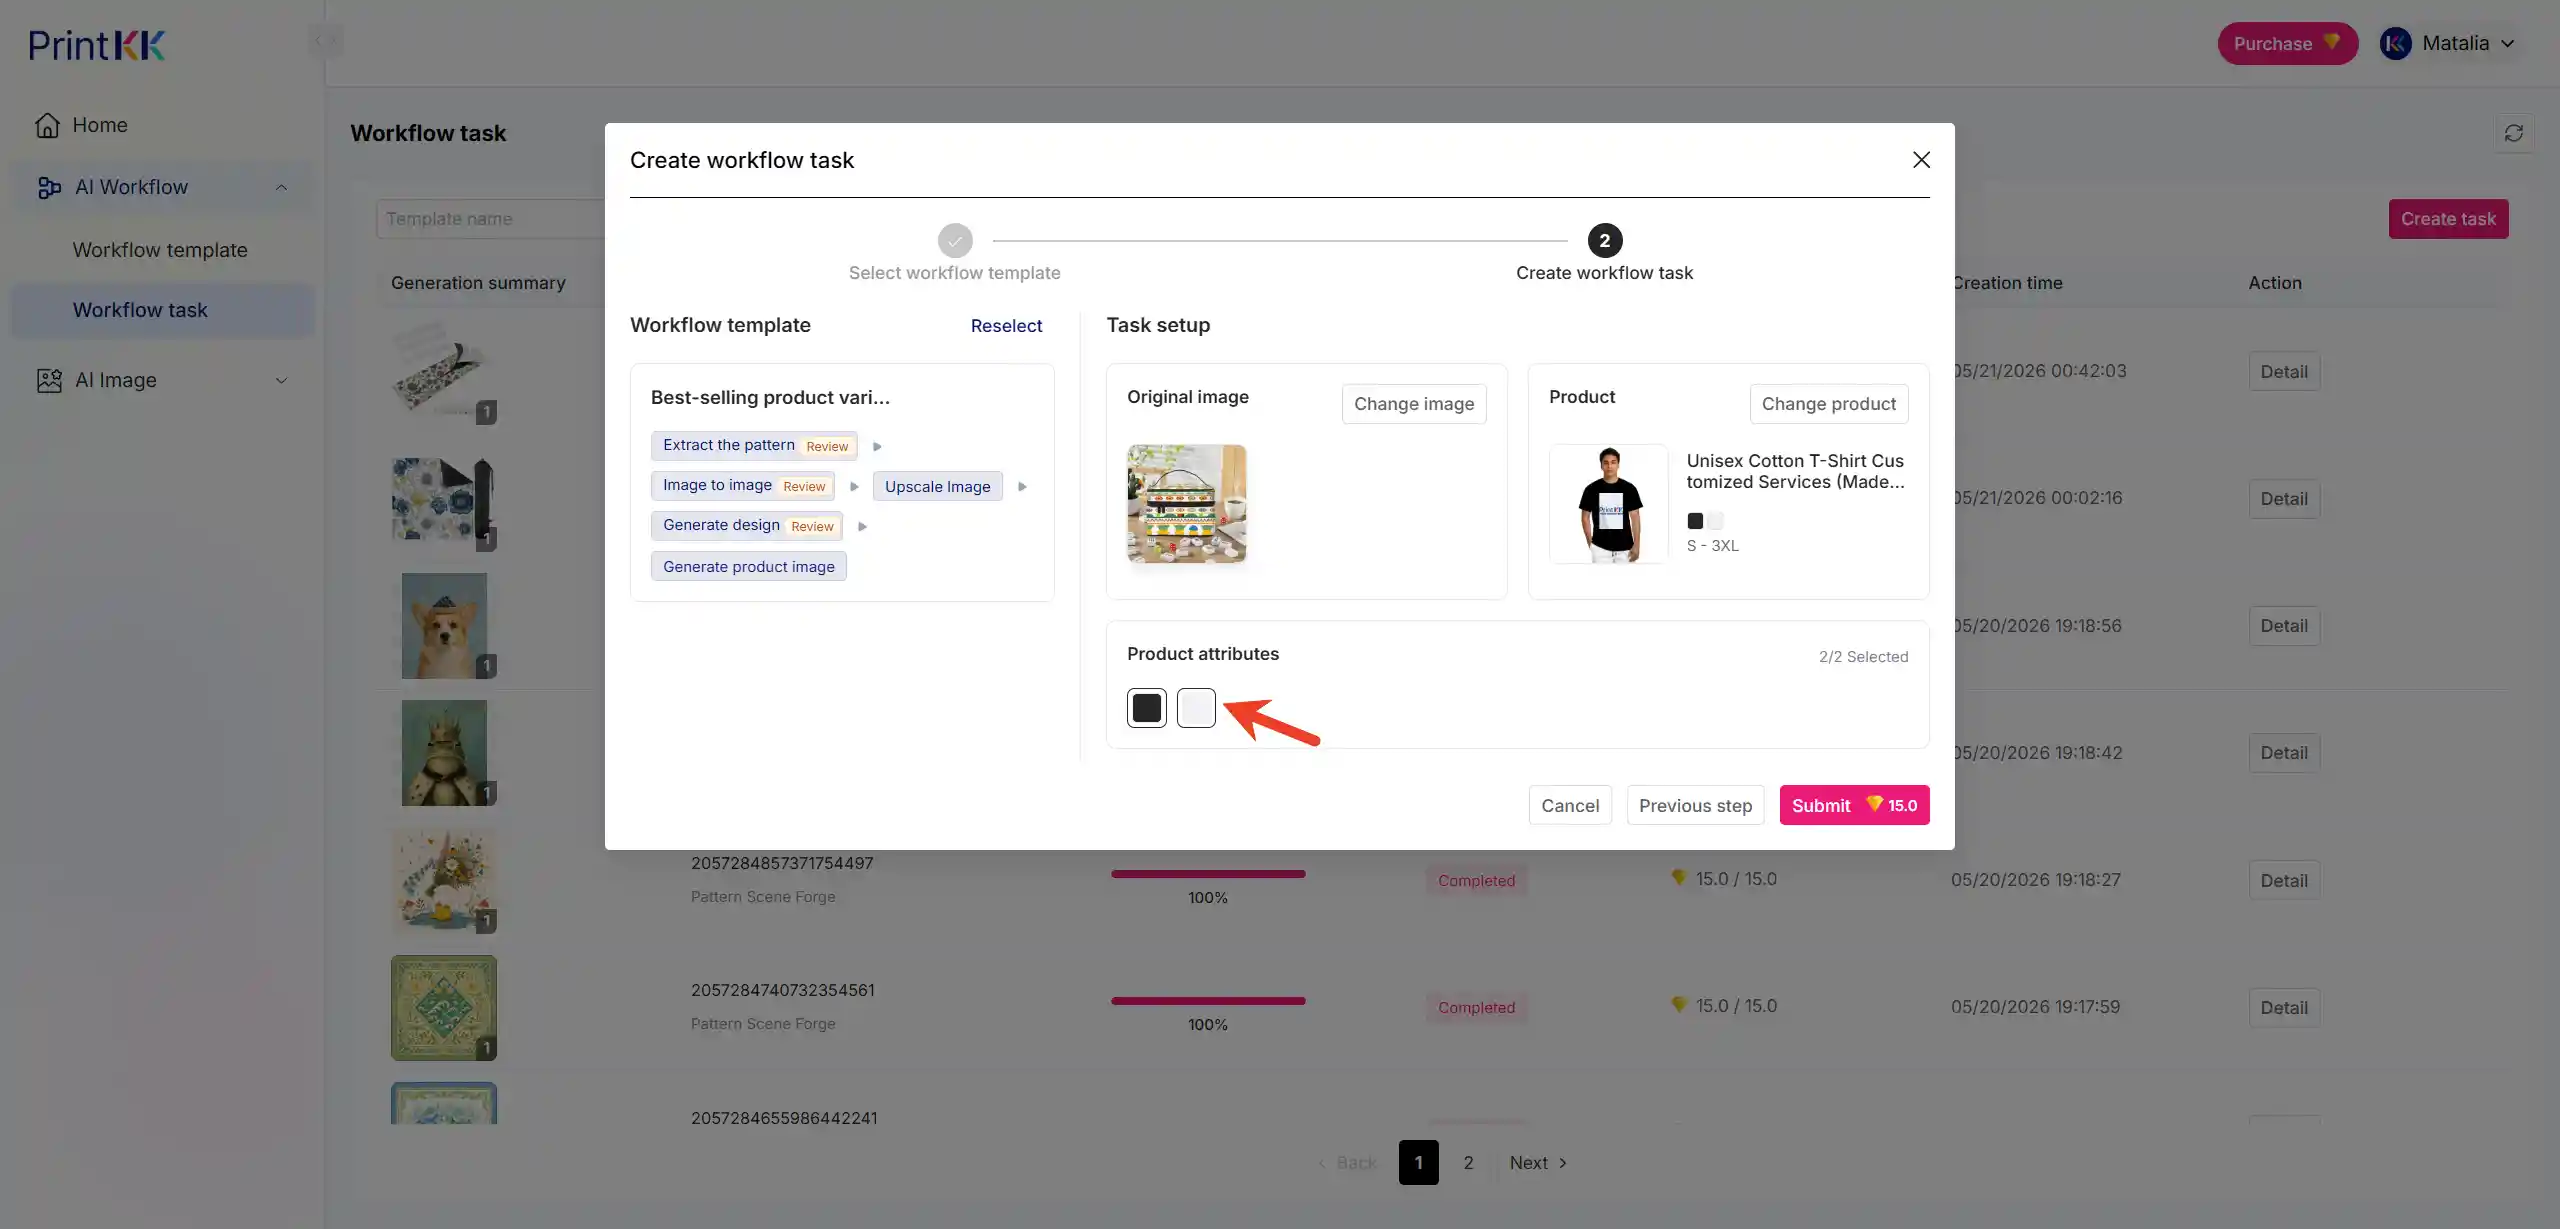
Step 8: Check the estimated Token and submit the task
Before submission, the page will show the estimated Token consumption for this task.
After confirming that the information is correct, click Submit.
The system will check whether you have enough Tokens. If you have enough Tokens, the task will start running.
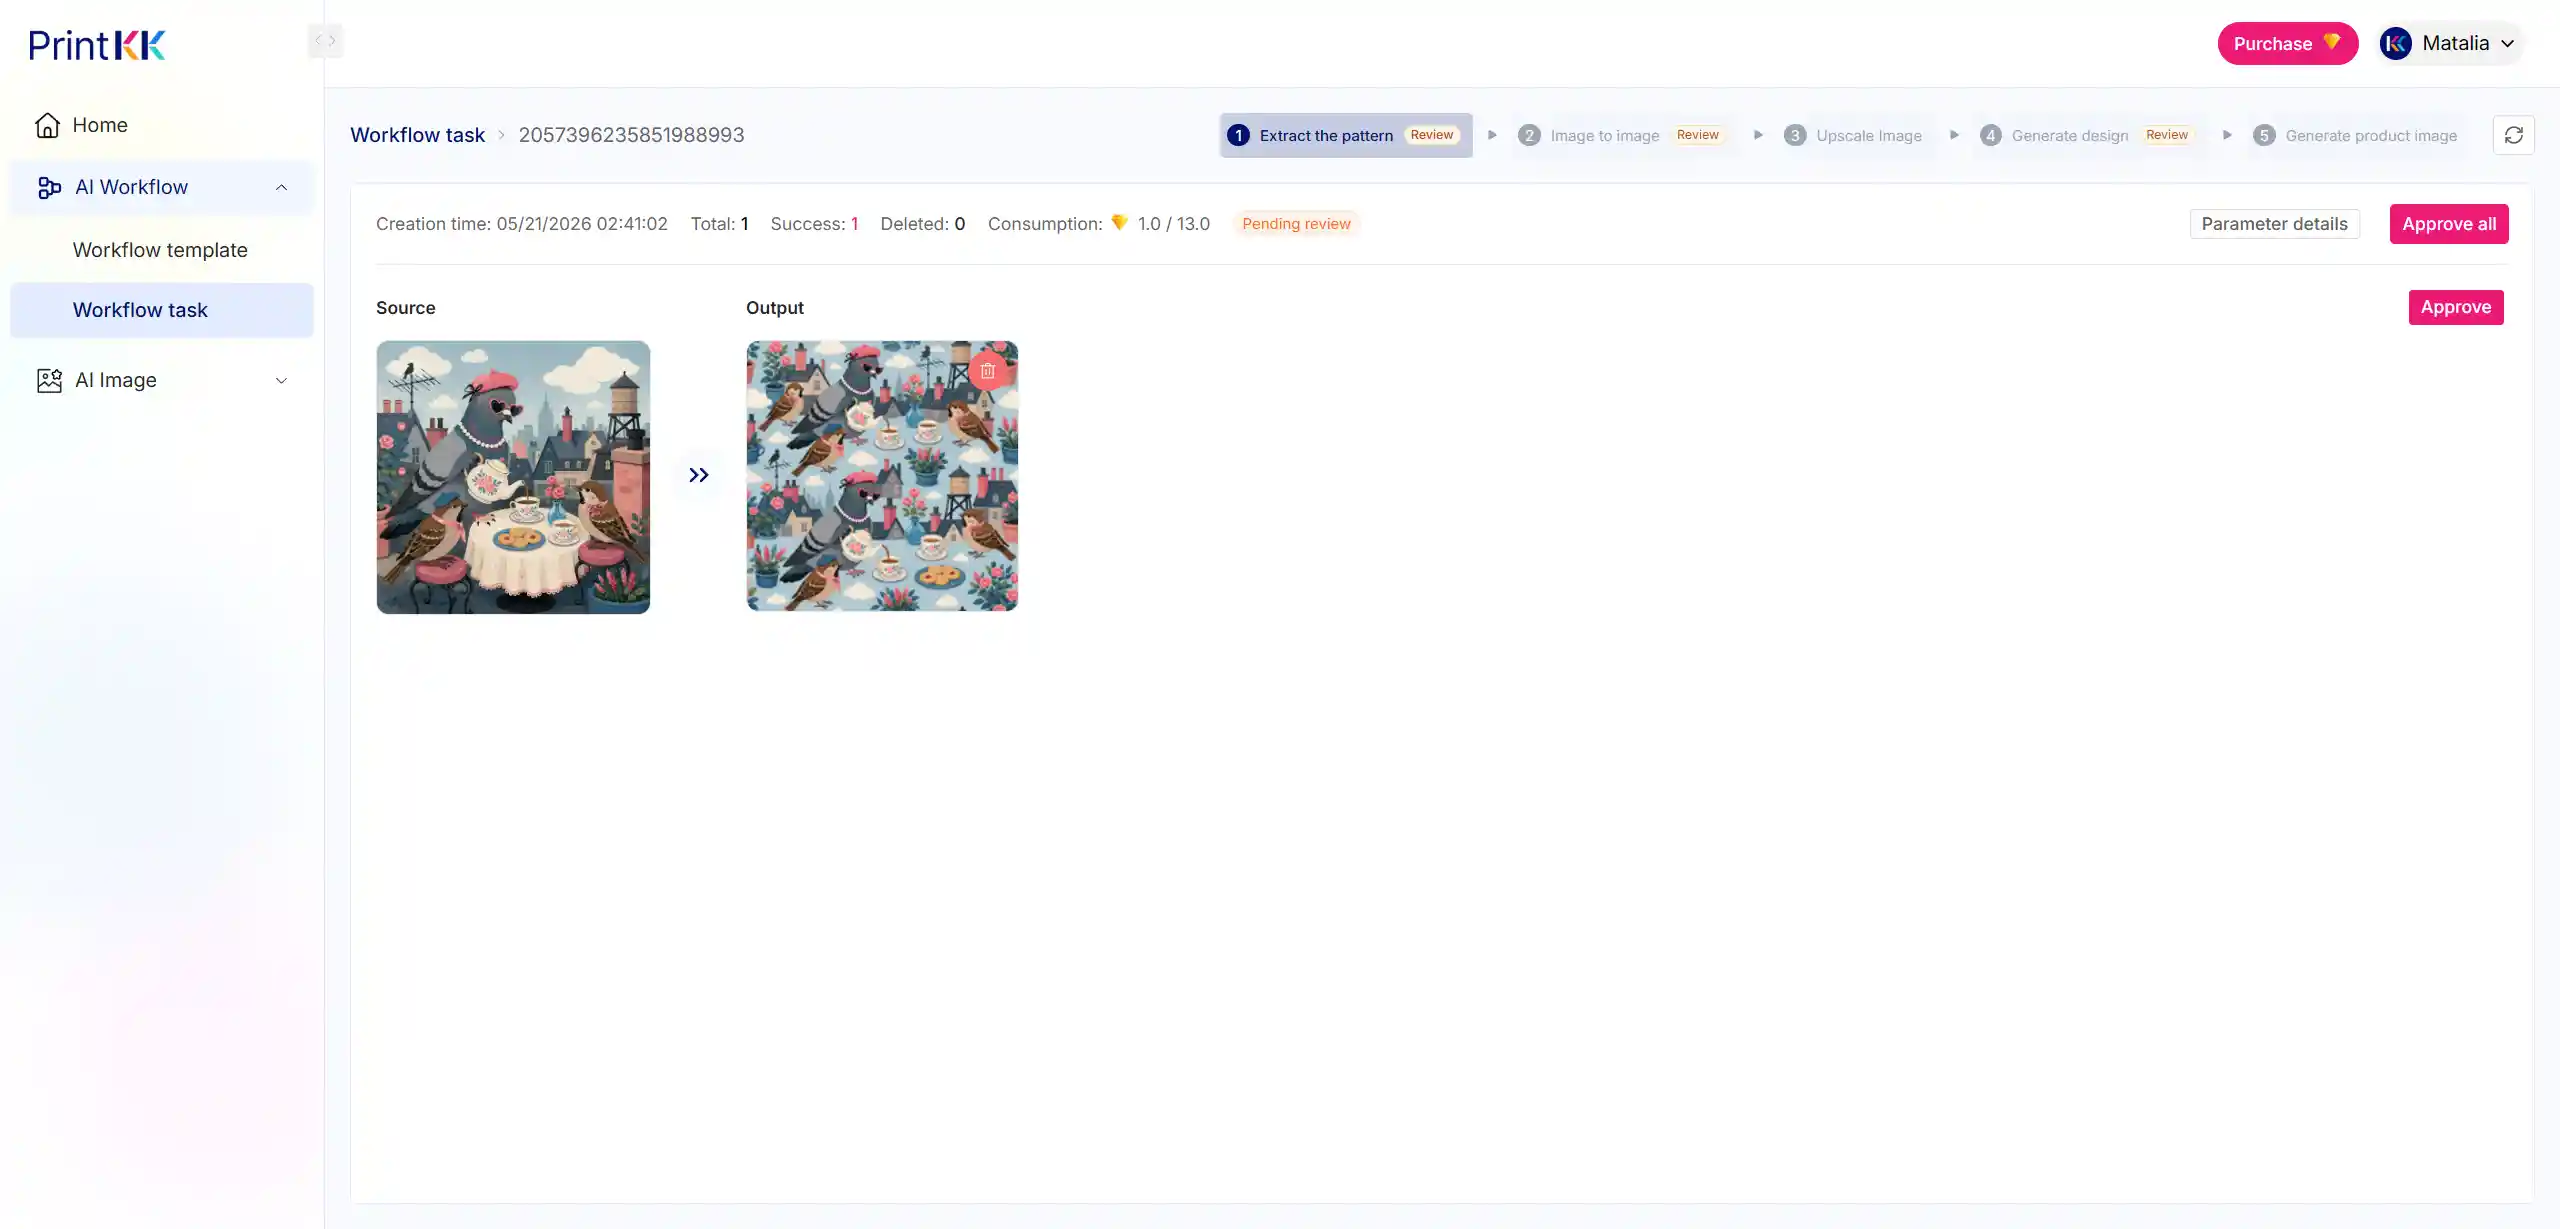
6. How to review generated results?
If a node requires review, the task will enter Pending review status.
On the task details page, move your mouse over the generated result, and the following options will appear:
- Delete
- Approve
If the generated result meets your requirements, click Approve. After approval, the result will show an Approved label and continue to the next process.
Approved images will be saved to My space. Approved designs will be saved to My design.
Delete
If you do not want to keep a generated result, click Delete. The system will ask for a second confirmation before deletion. Deleted results cannot be recovered.
7. What is Token consumption?
Token consumption shows the Token usage of the task.
When creating a task, the system estimates how many Tokens the task may consume. During task execution, if you delete some intermediate results, the system will not continue generating content for those results in later steps, so the actual consumption may be lower than the estimated consumption.
8. How to Stop a task?
When a task is still running, the Stop button may be displayed.
Please note:
- Once a task is Stop, it cannot be restarted
- Used Tokens cannot be refunded
Therefore, we only recommend using Stop when you are sure you no longer need the task.
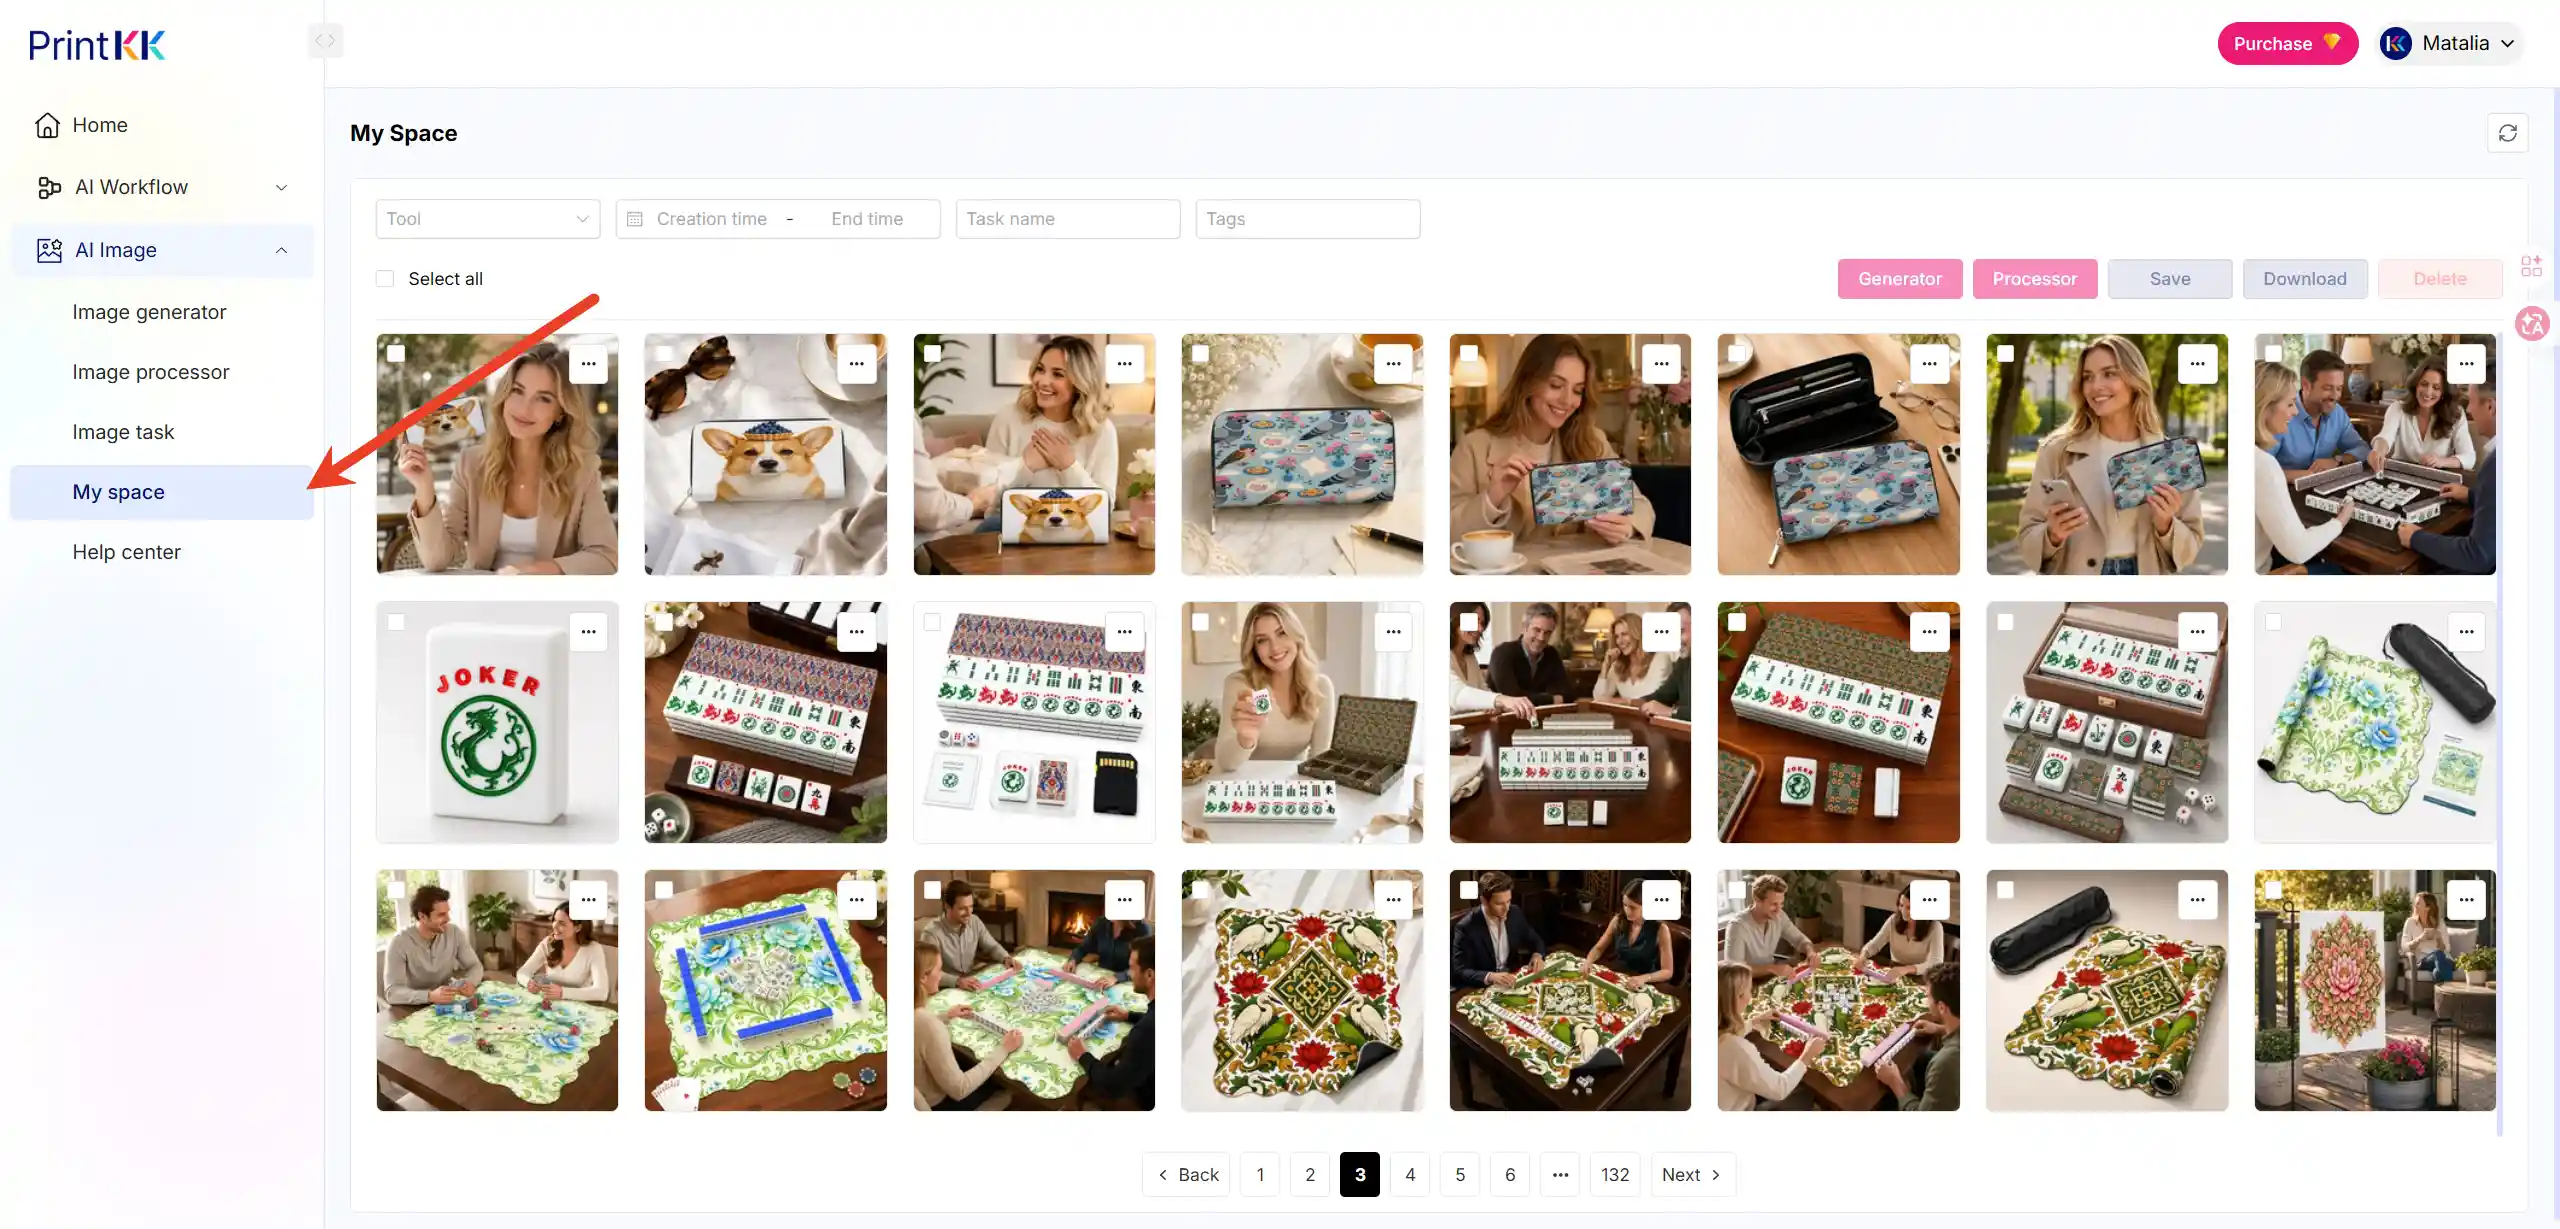
9. Where are generated results saved?
Different types of results are saved in different places.
If you delete a result in the task, that result will not continue to the next process.
10. Advanced: How to create your own Workflow Template?
If you are already familiar with official templates, you can also create your own Workflow Template.
Custom templates are suitable for the following situations:
- You want to control the generation quantity for each step
- You want to select different AI Model
- You want to decide which steps require manual review
- You want to create different workflows for different product types
- You want to manage multiple templates by group
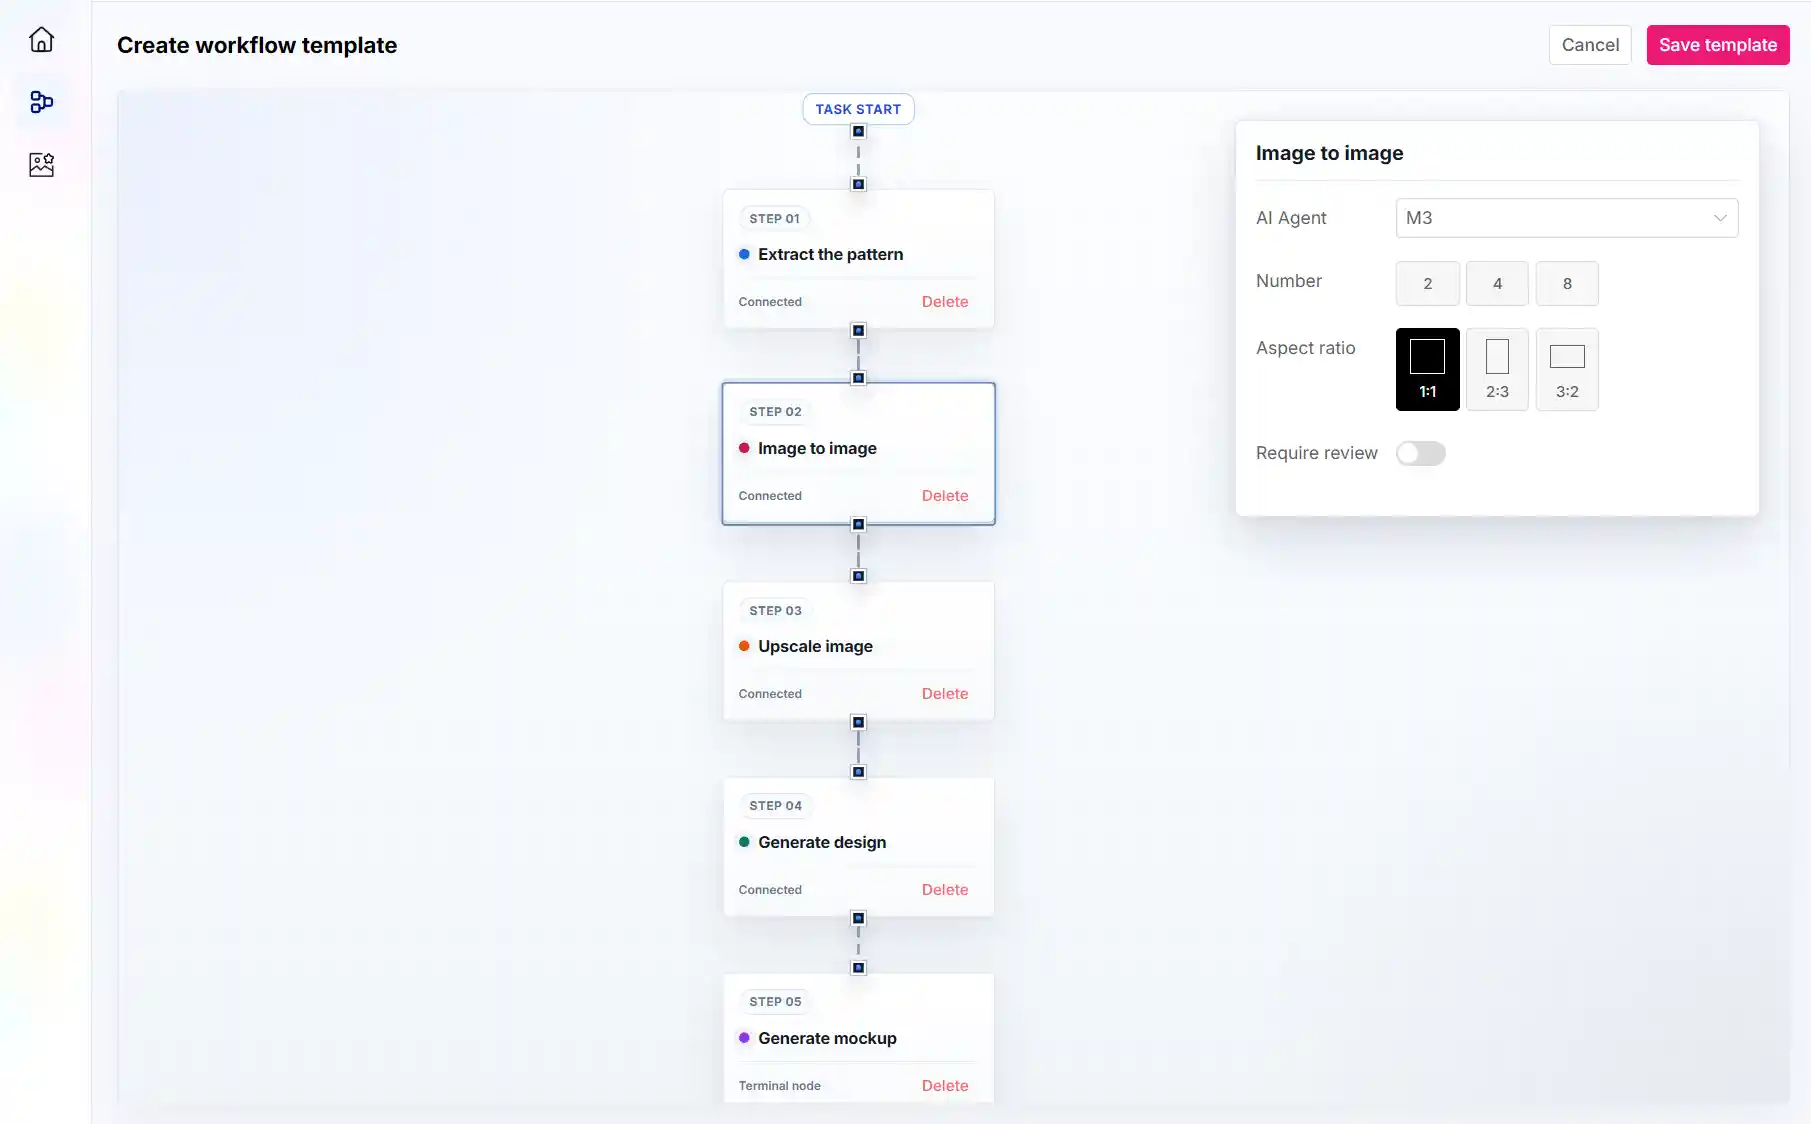
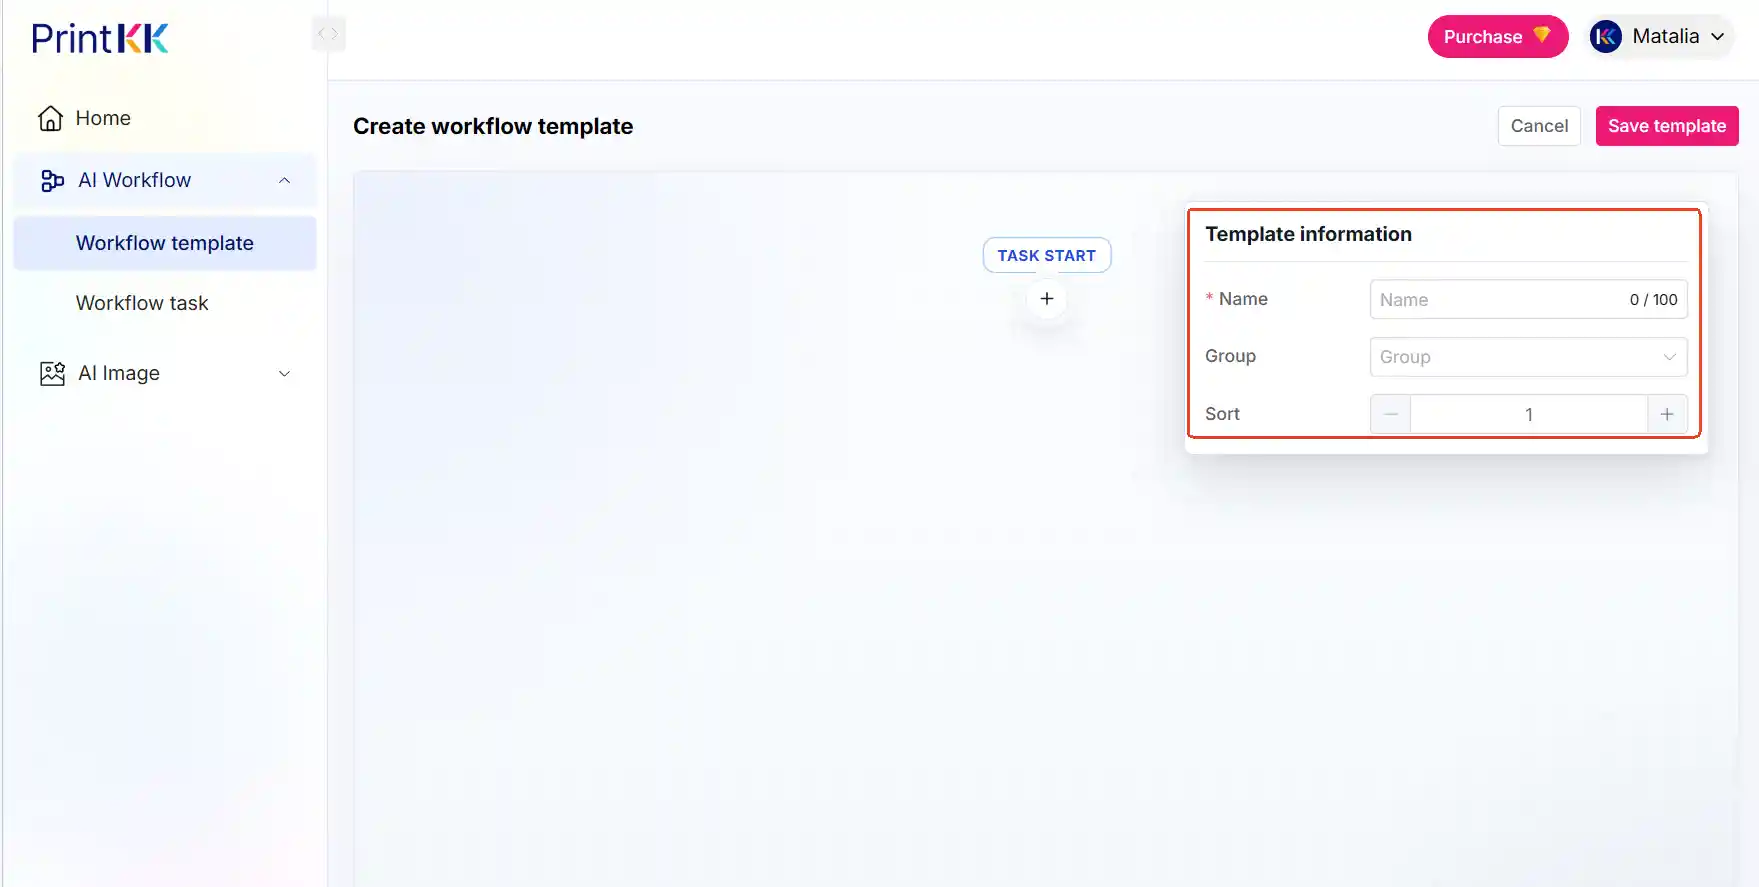
10.1 Template information
When creating a template, you first need to fill in the basic template information.
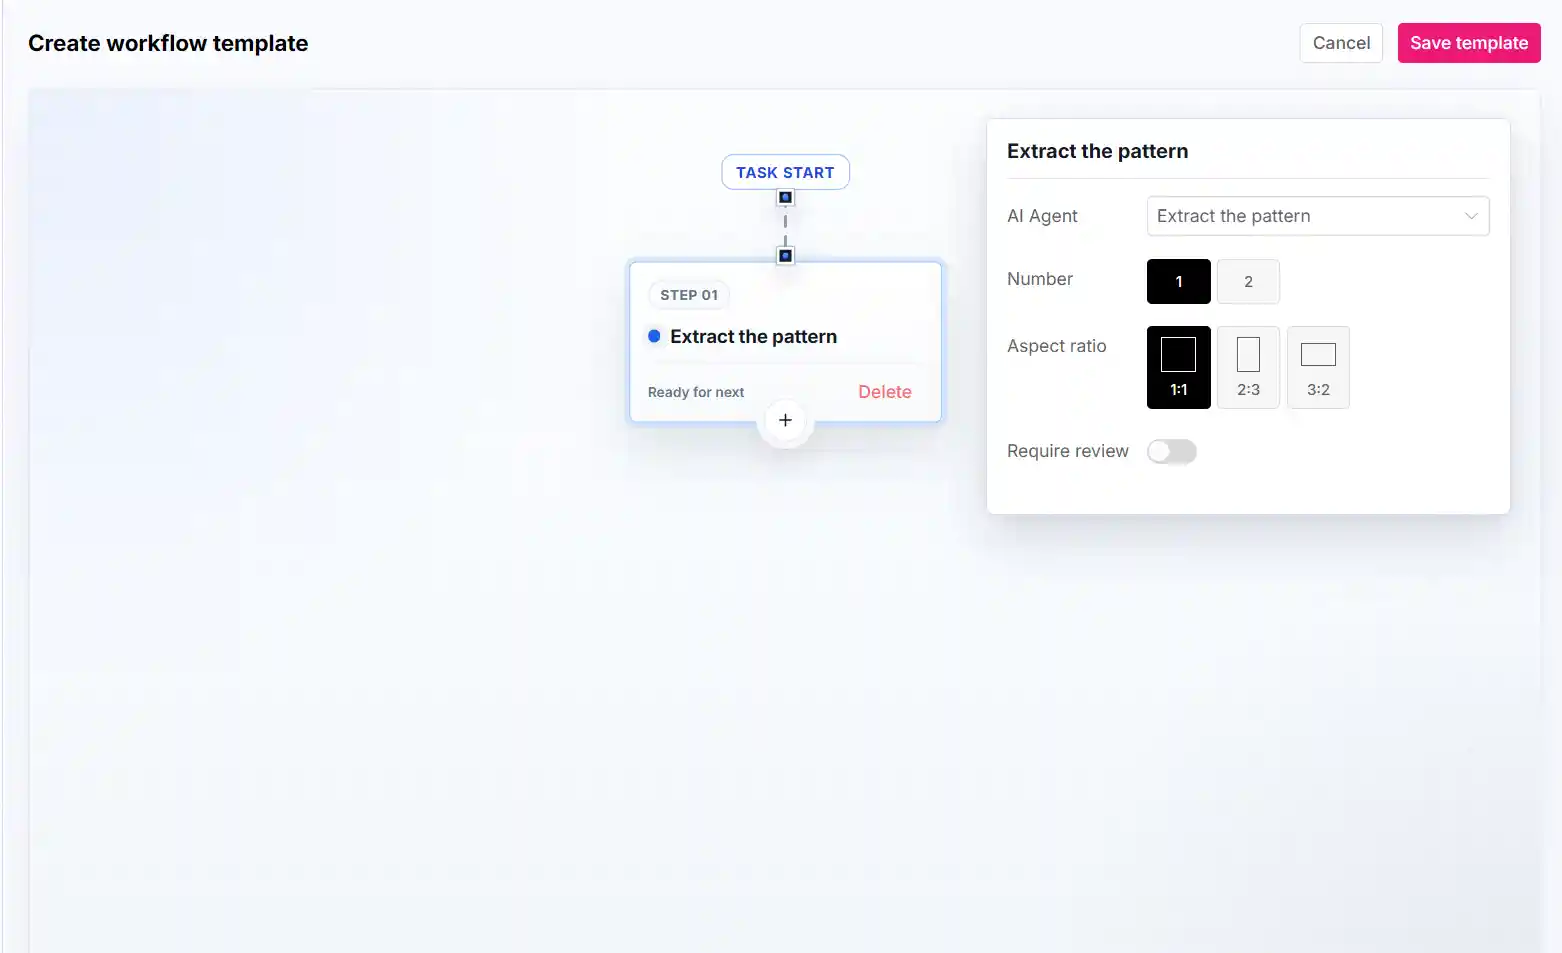
10.2 Extract the pattern parameters
Extract the pattern is used to extract patterns from original images.
Configurable parameters include:
If Require review is enabled, after this node generates results, users need to approve the results before the workflow can continue.
10.3 Image to image parameters
Image to image is used to generate new image variations based on the image generated by the previous node.
Configurable parameters include:
If Require review is enabled, after this node generates results, users need to approve the results before the workflow can continue to the next step.
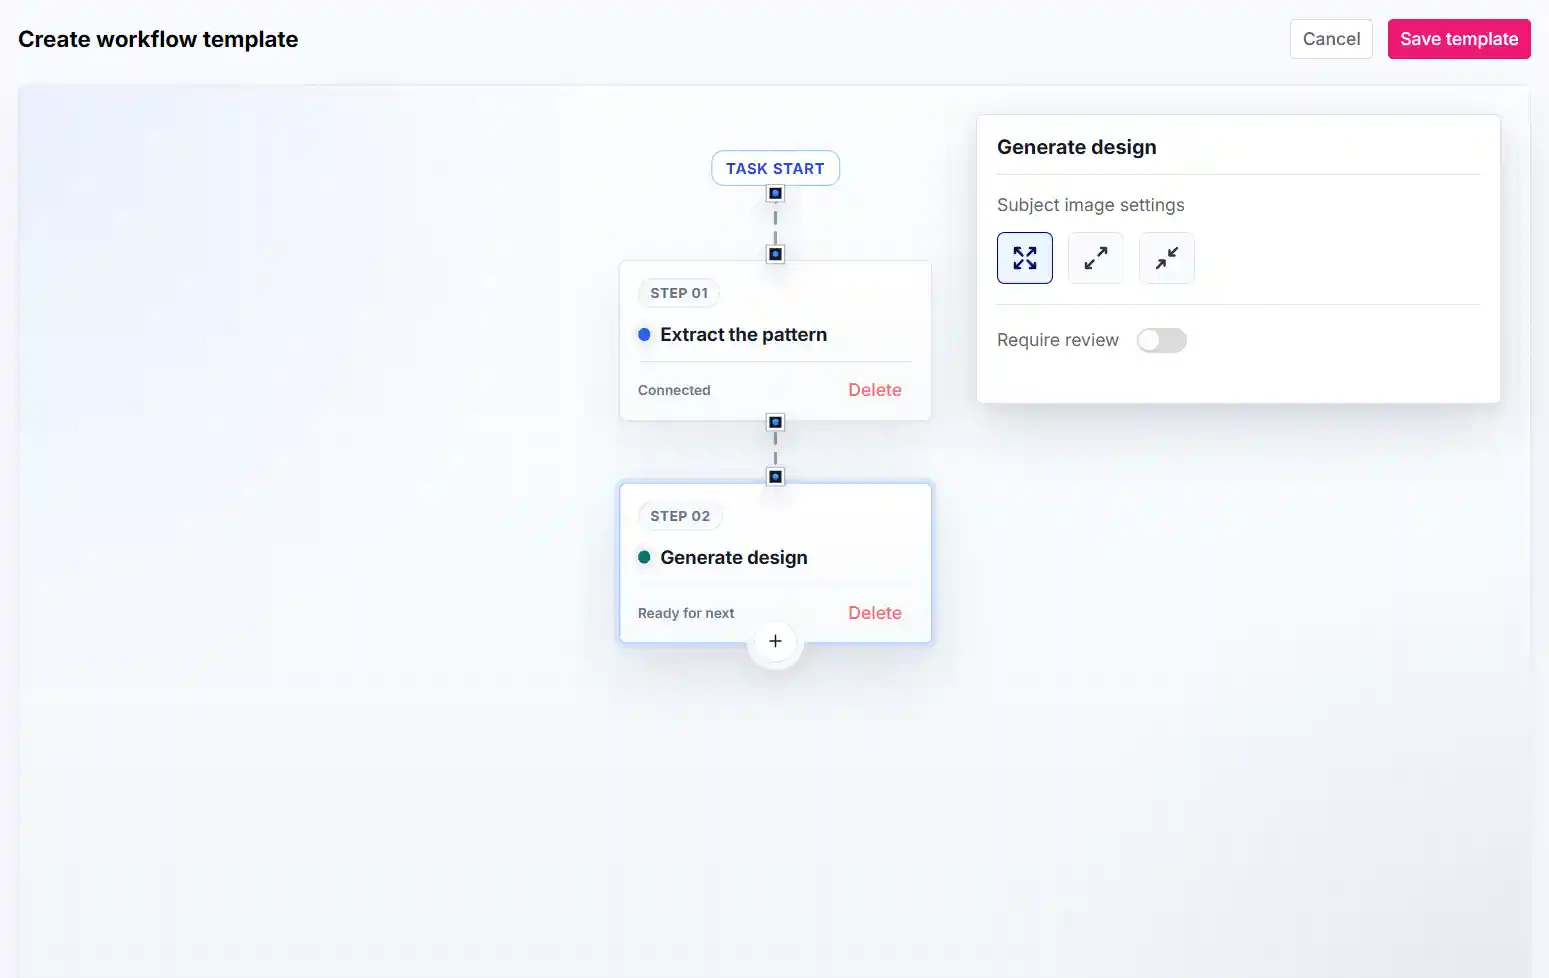
10.5 Generate design parameters
Generate design is used to apply the pattern to a product and generate a product design.
Configurable parameters include:
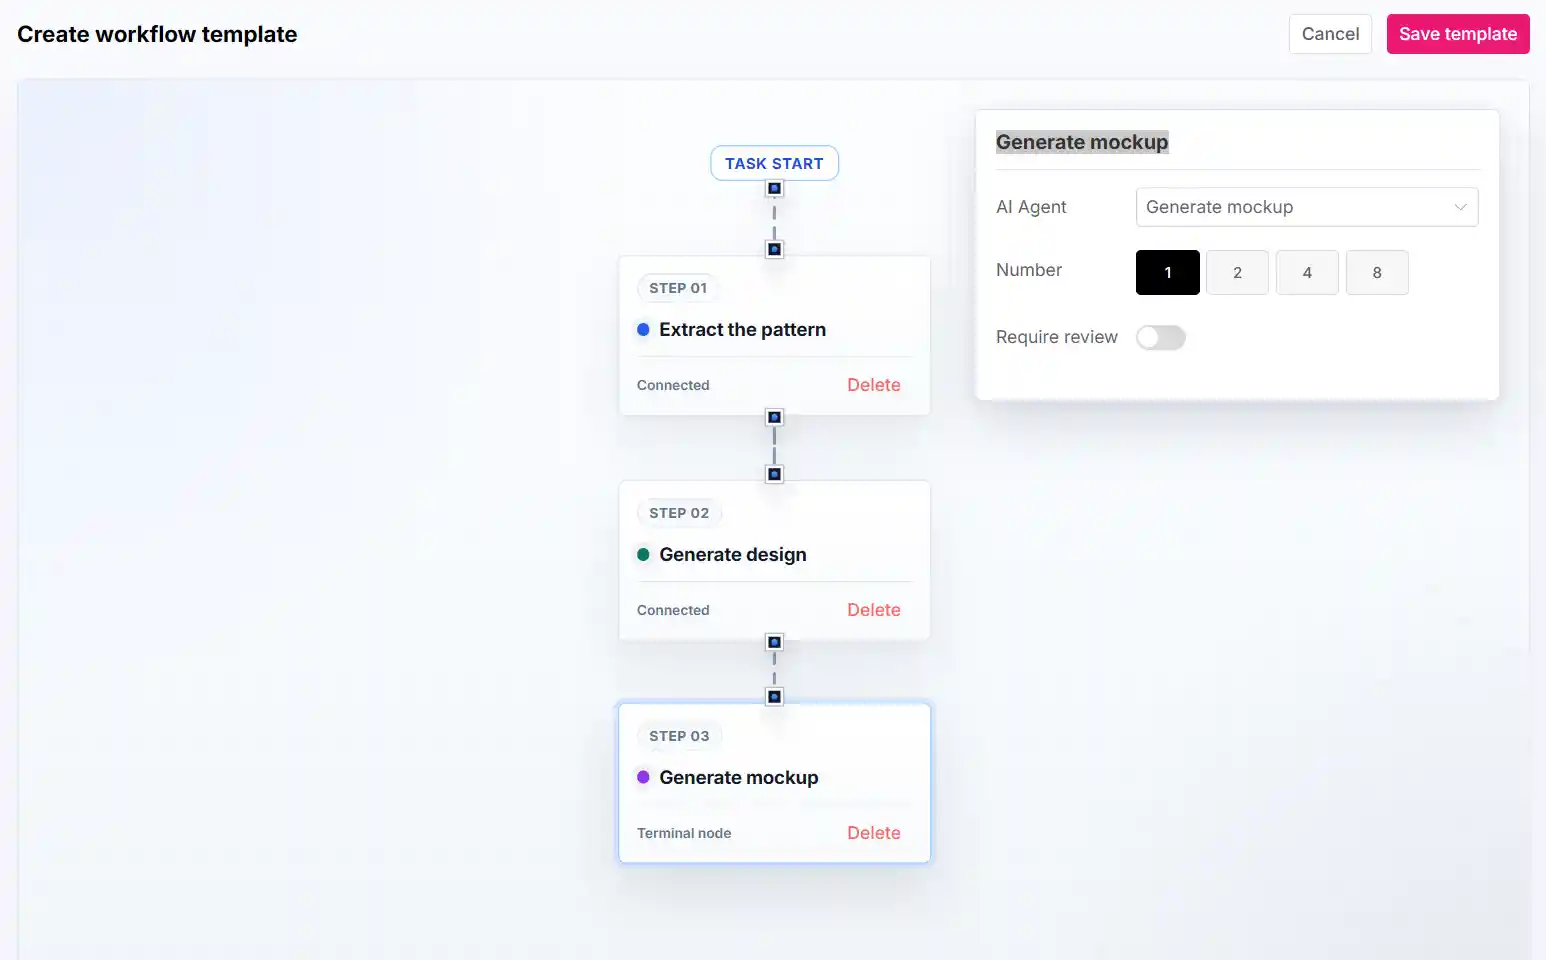
10.5 Generate mockup parameters
Generate mockup is used to generate AI product scene images based on the product design.
Configurable parameters include:
Situations where enabling Require review is recommended:
- You need to select the most suitable scene images for store display
- You want to delete unnatural or unsatisfactory scene images
- You want to make sure the final images saved to My space meet your quality standards
10.6 How does the Require review switch work?
Require review determines whether a node requires manual review.
When enabled:
- The node generates results
- The task enters Pending review
- The user reviews the results
- After approval, the workflow continues to the next step
When disabled:
- The node generates results
- The system automatically continues to the next step
- No manual confirmation is required
When is it recommended to enable Require review?
We recommend enabling it for these nodes:
- Extract the pattern
Used to select the best patterns. - Image to image
Used to select image variations that are more suitable for later design steps. - Generate mockup
Used to select the most suitable product scene images or mockups for display.
When can it be disabled?
If you want the task to run automatically and reduce manual operations, you can disable Require review.
However, the system will automatically pass the generated results into the following steps.
10.7 Edit group management
On the Workflow templates page, click Edit group to manage template groups.
Supported actions:
- Add group
- Edit group
- Delete group
- View group
Group name requirements:
- Up to 50 characters
- Cannot be duplicated
Mockup Library and AI Mockups Tutorial
PrintKK has upgraded its POD product image asset management process. With the advanced AI scene generator, you can automatically turn flat designs into scene images that are more suitable for commercial display, manage them by specification in the mockup library, drag and reorder images, and finally use them for product publishing.
Simply put, the core workflow of this feature is:
My designs → AI Mockups → Mockup library → Publish
1. Core Feature Entry Points
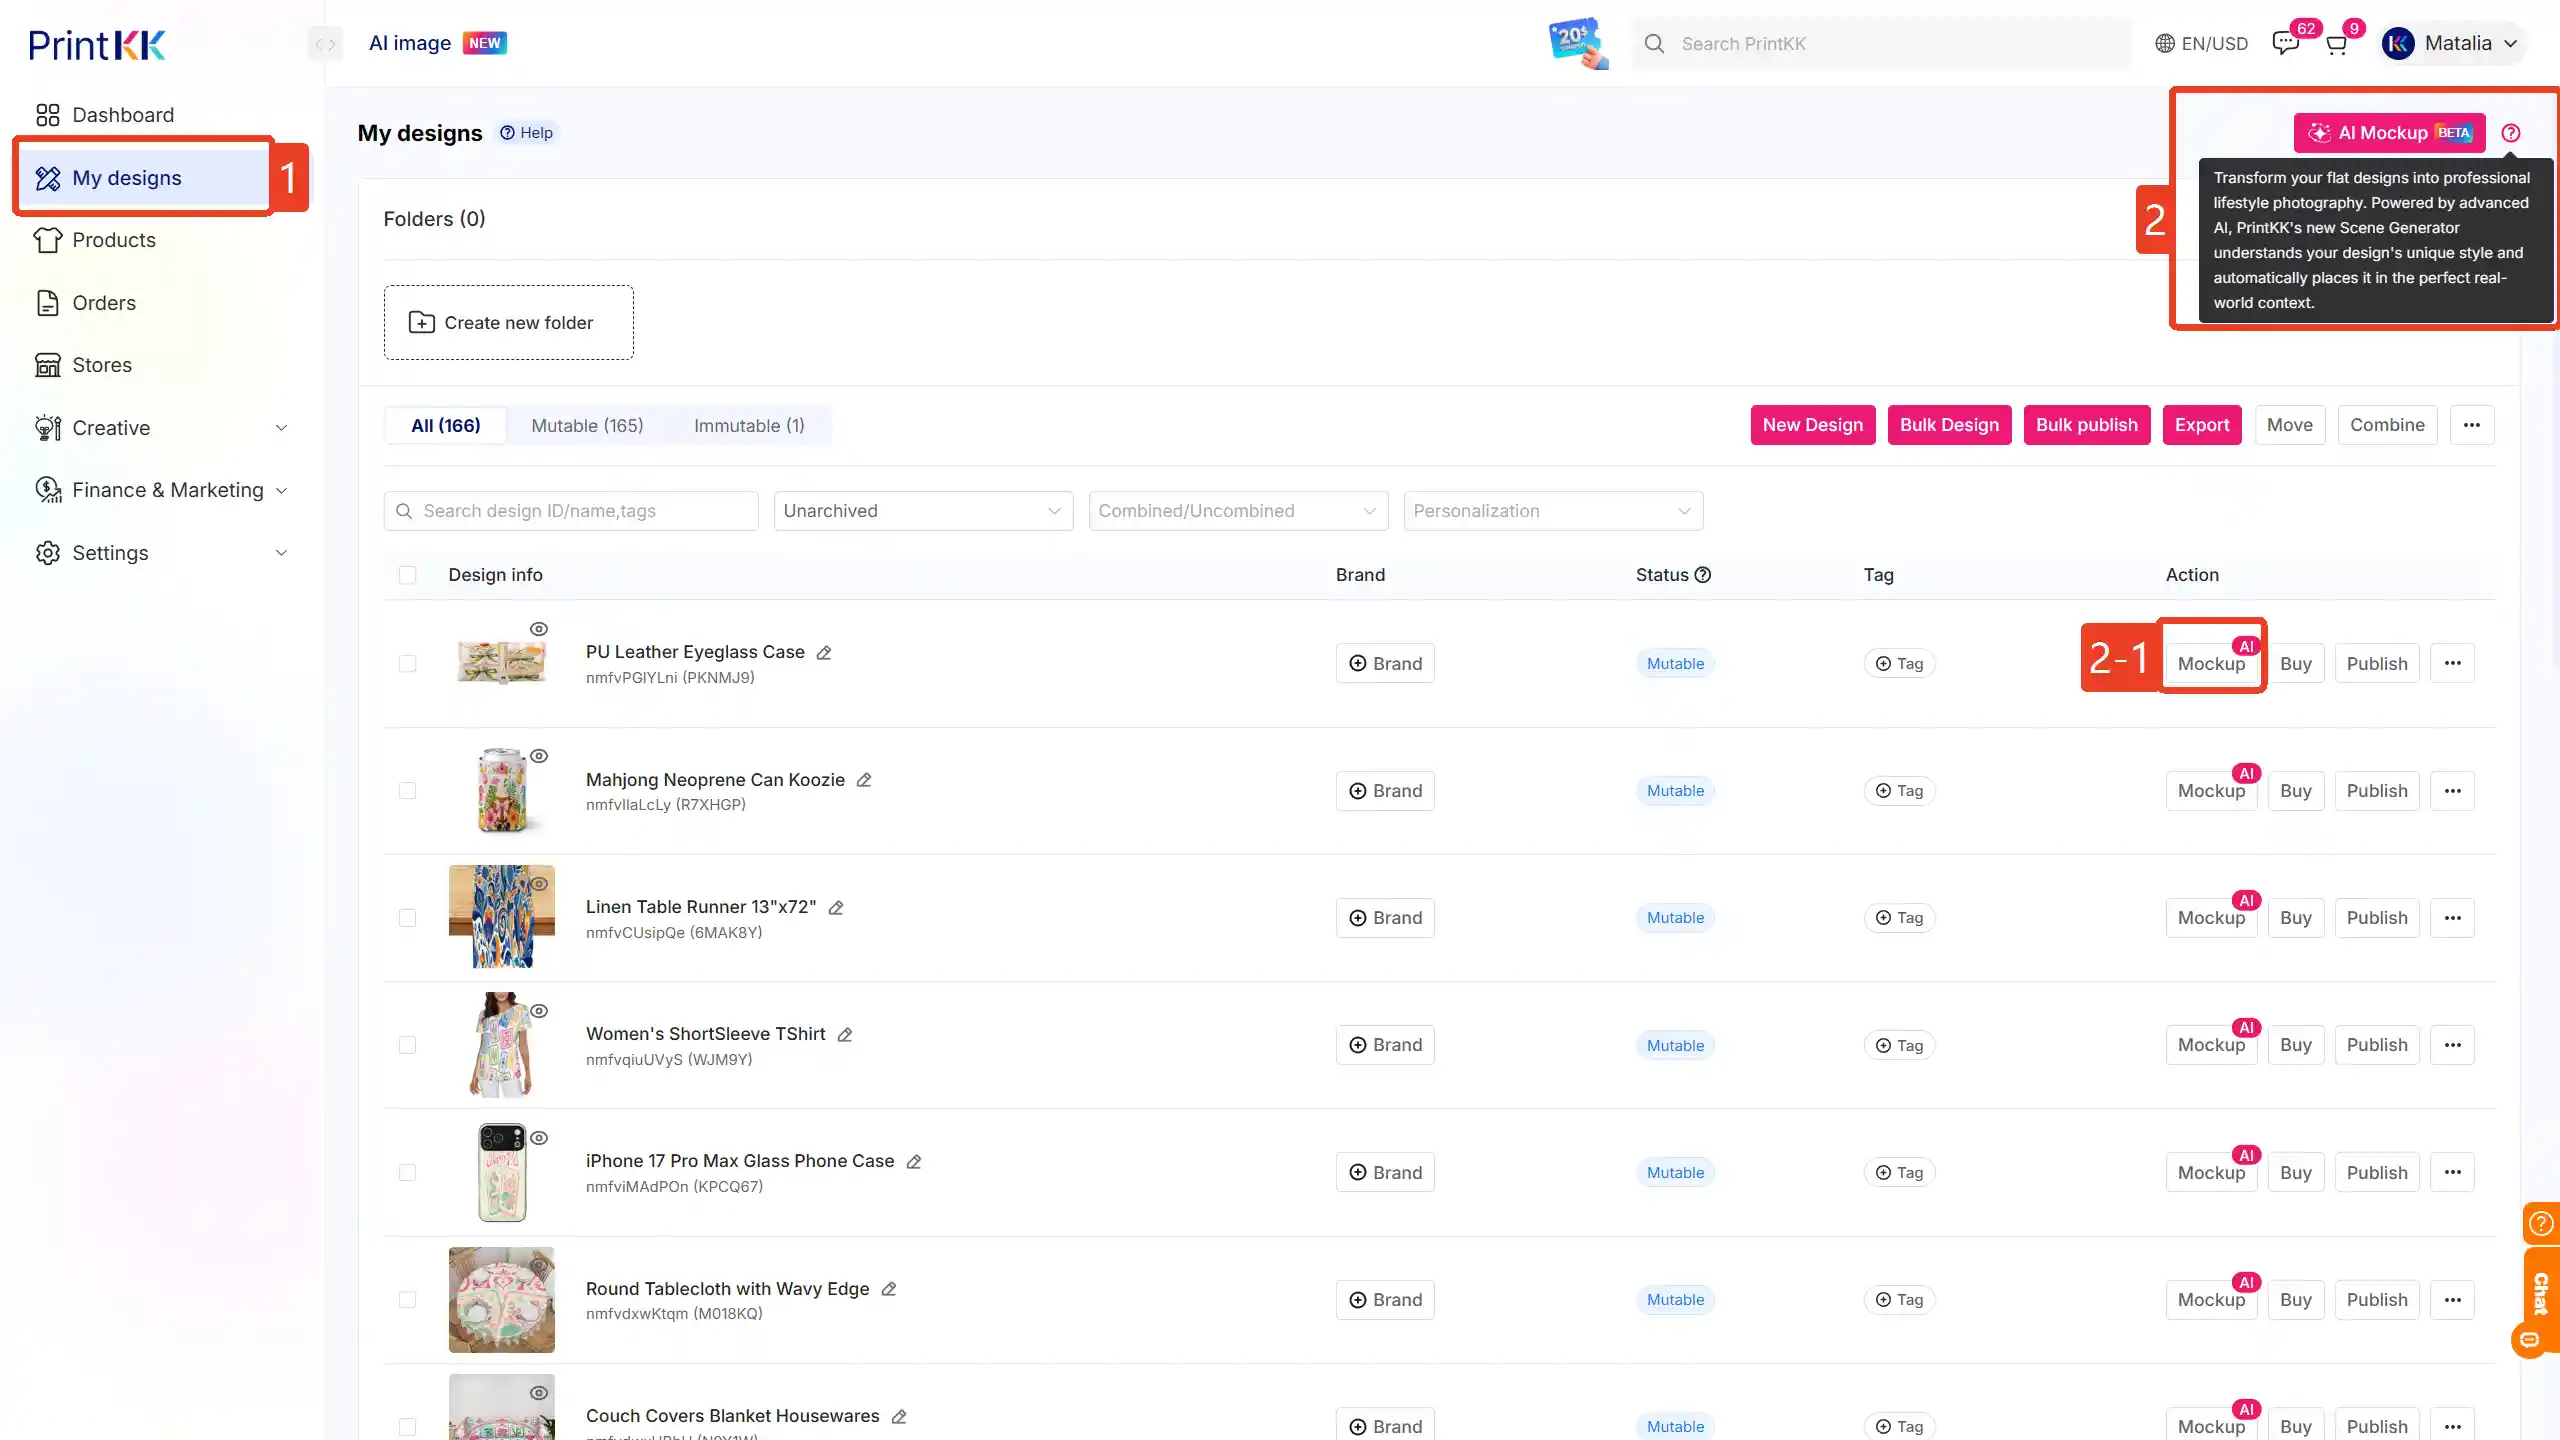
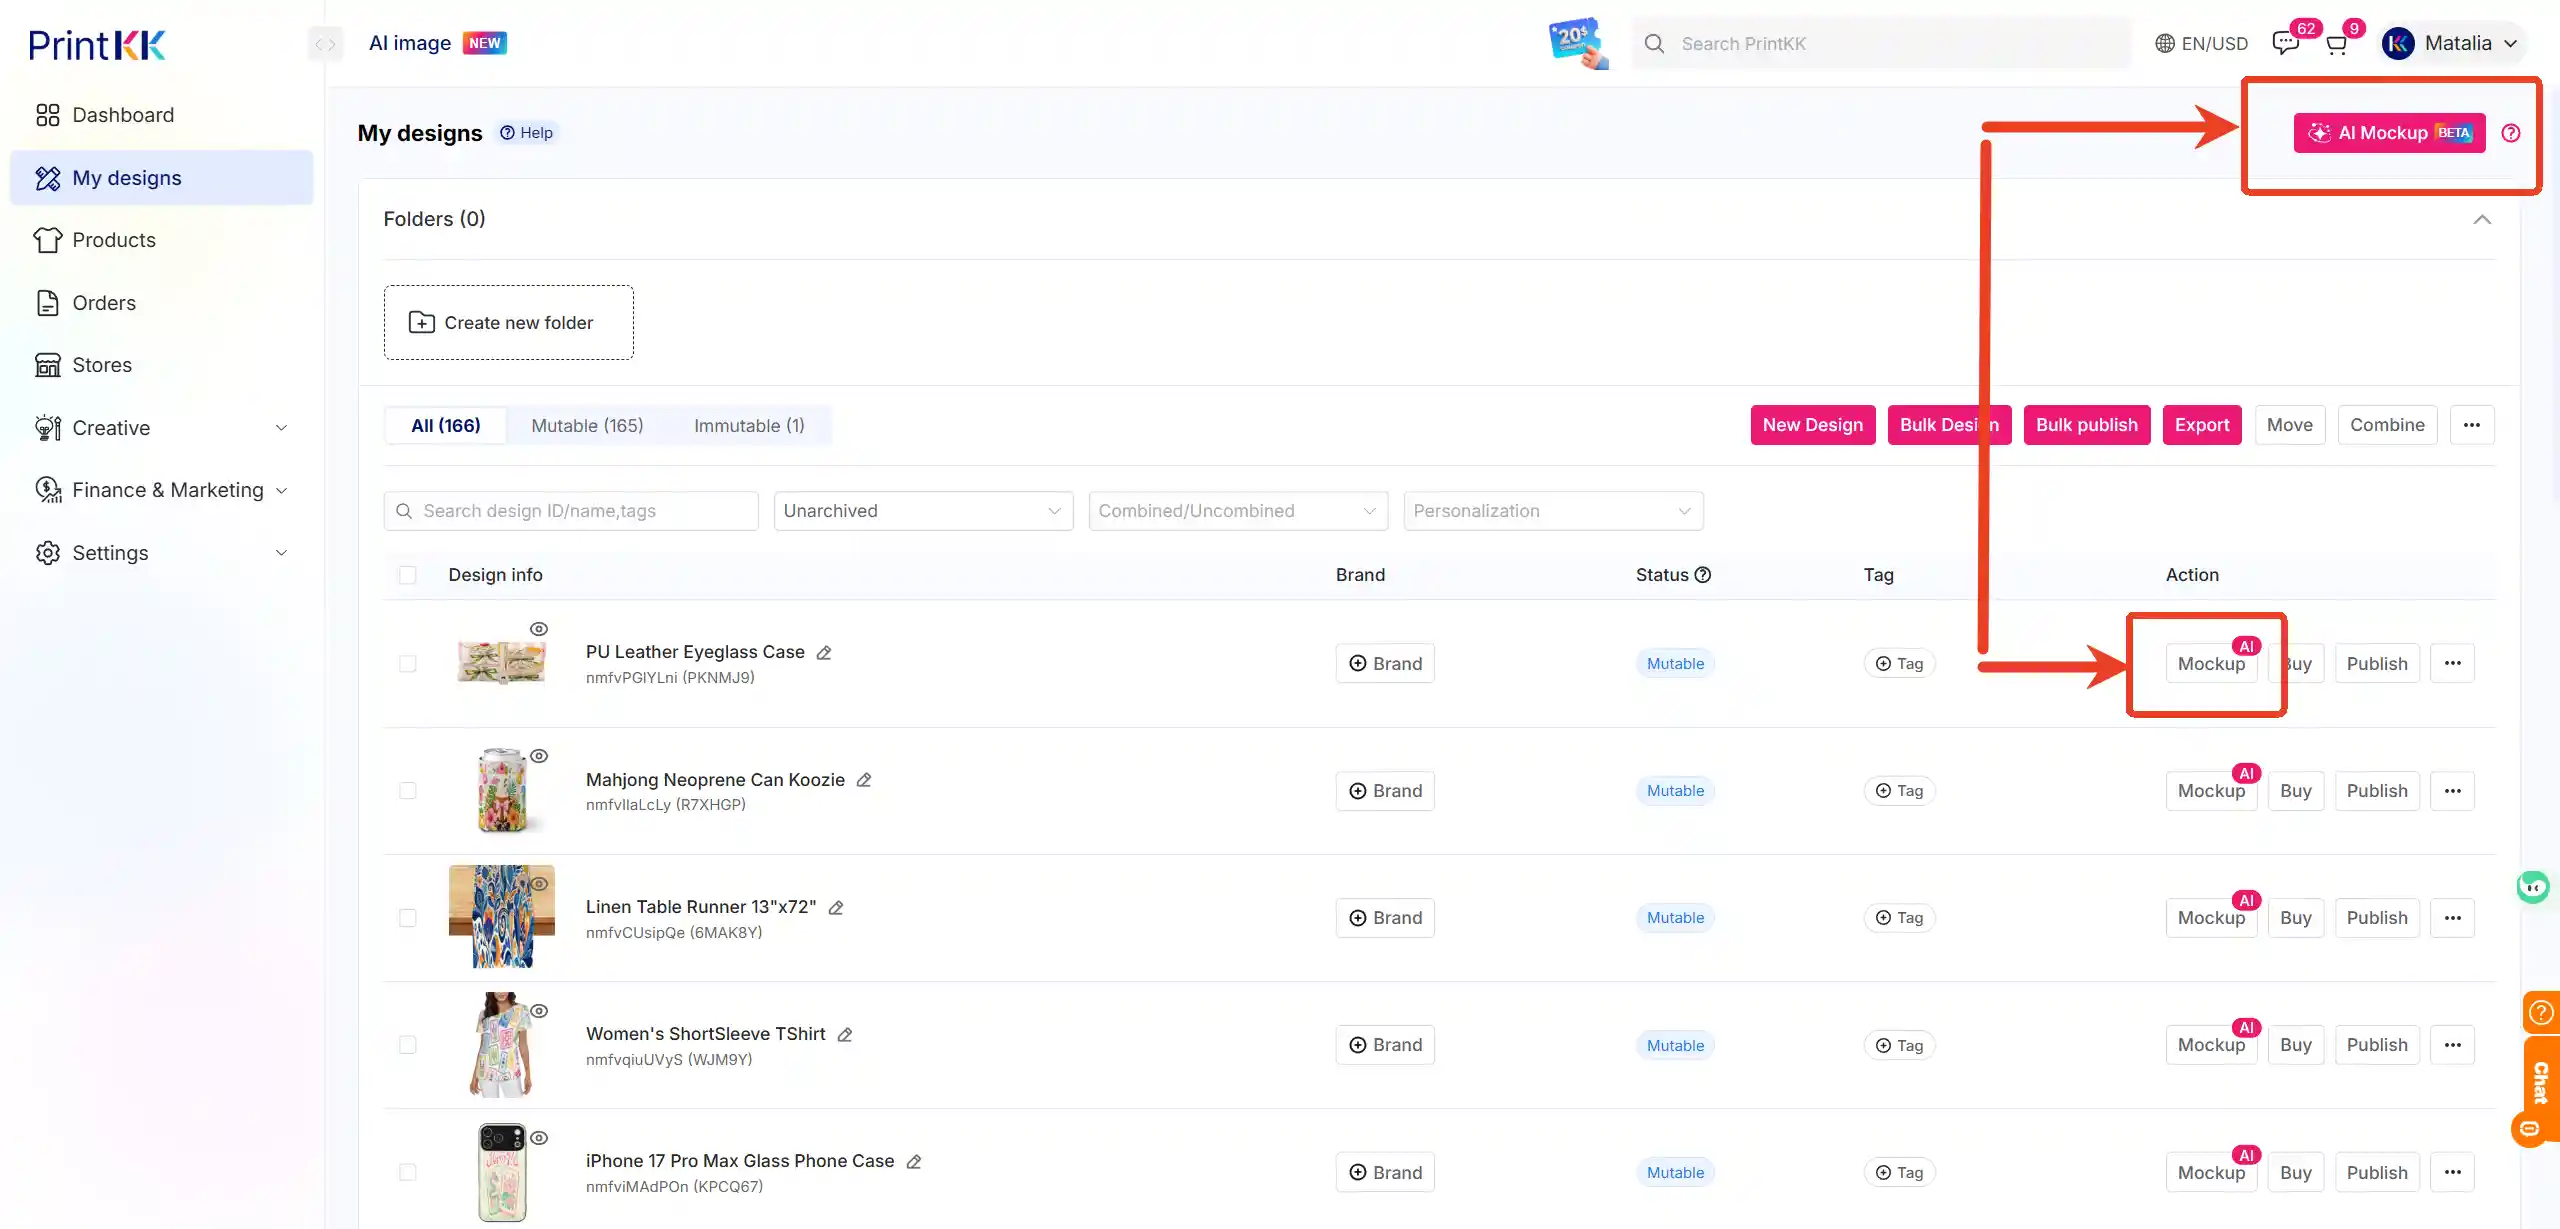
After logging in to the PrintKK Dashboard, go to the My designs page. You will see two AI-related entry points.
1.1 AI Mockups Button at the Top
Click the AI Mockups button at the top of the page to enter the AI Mockups task center. Here, you can batch create, view, monitor, and manage AI scene image generation tasks.
1.2 Mockup Button on the Design Card
On the right side of each independent, non-archived design, you will see a Mockup button. If the product has enabled the AI scene image feature, the button will display an AI badge.
Click the Mockup button to open the Mockup library drawer for that design.
2. AI Mockups Task Center
Click AI Mockups at the top to enter the task center.
2.1 Create an AI Scene Image Task
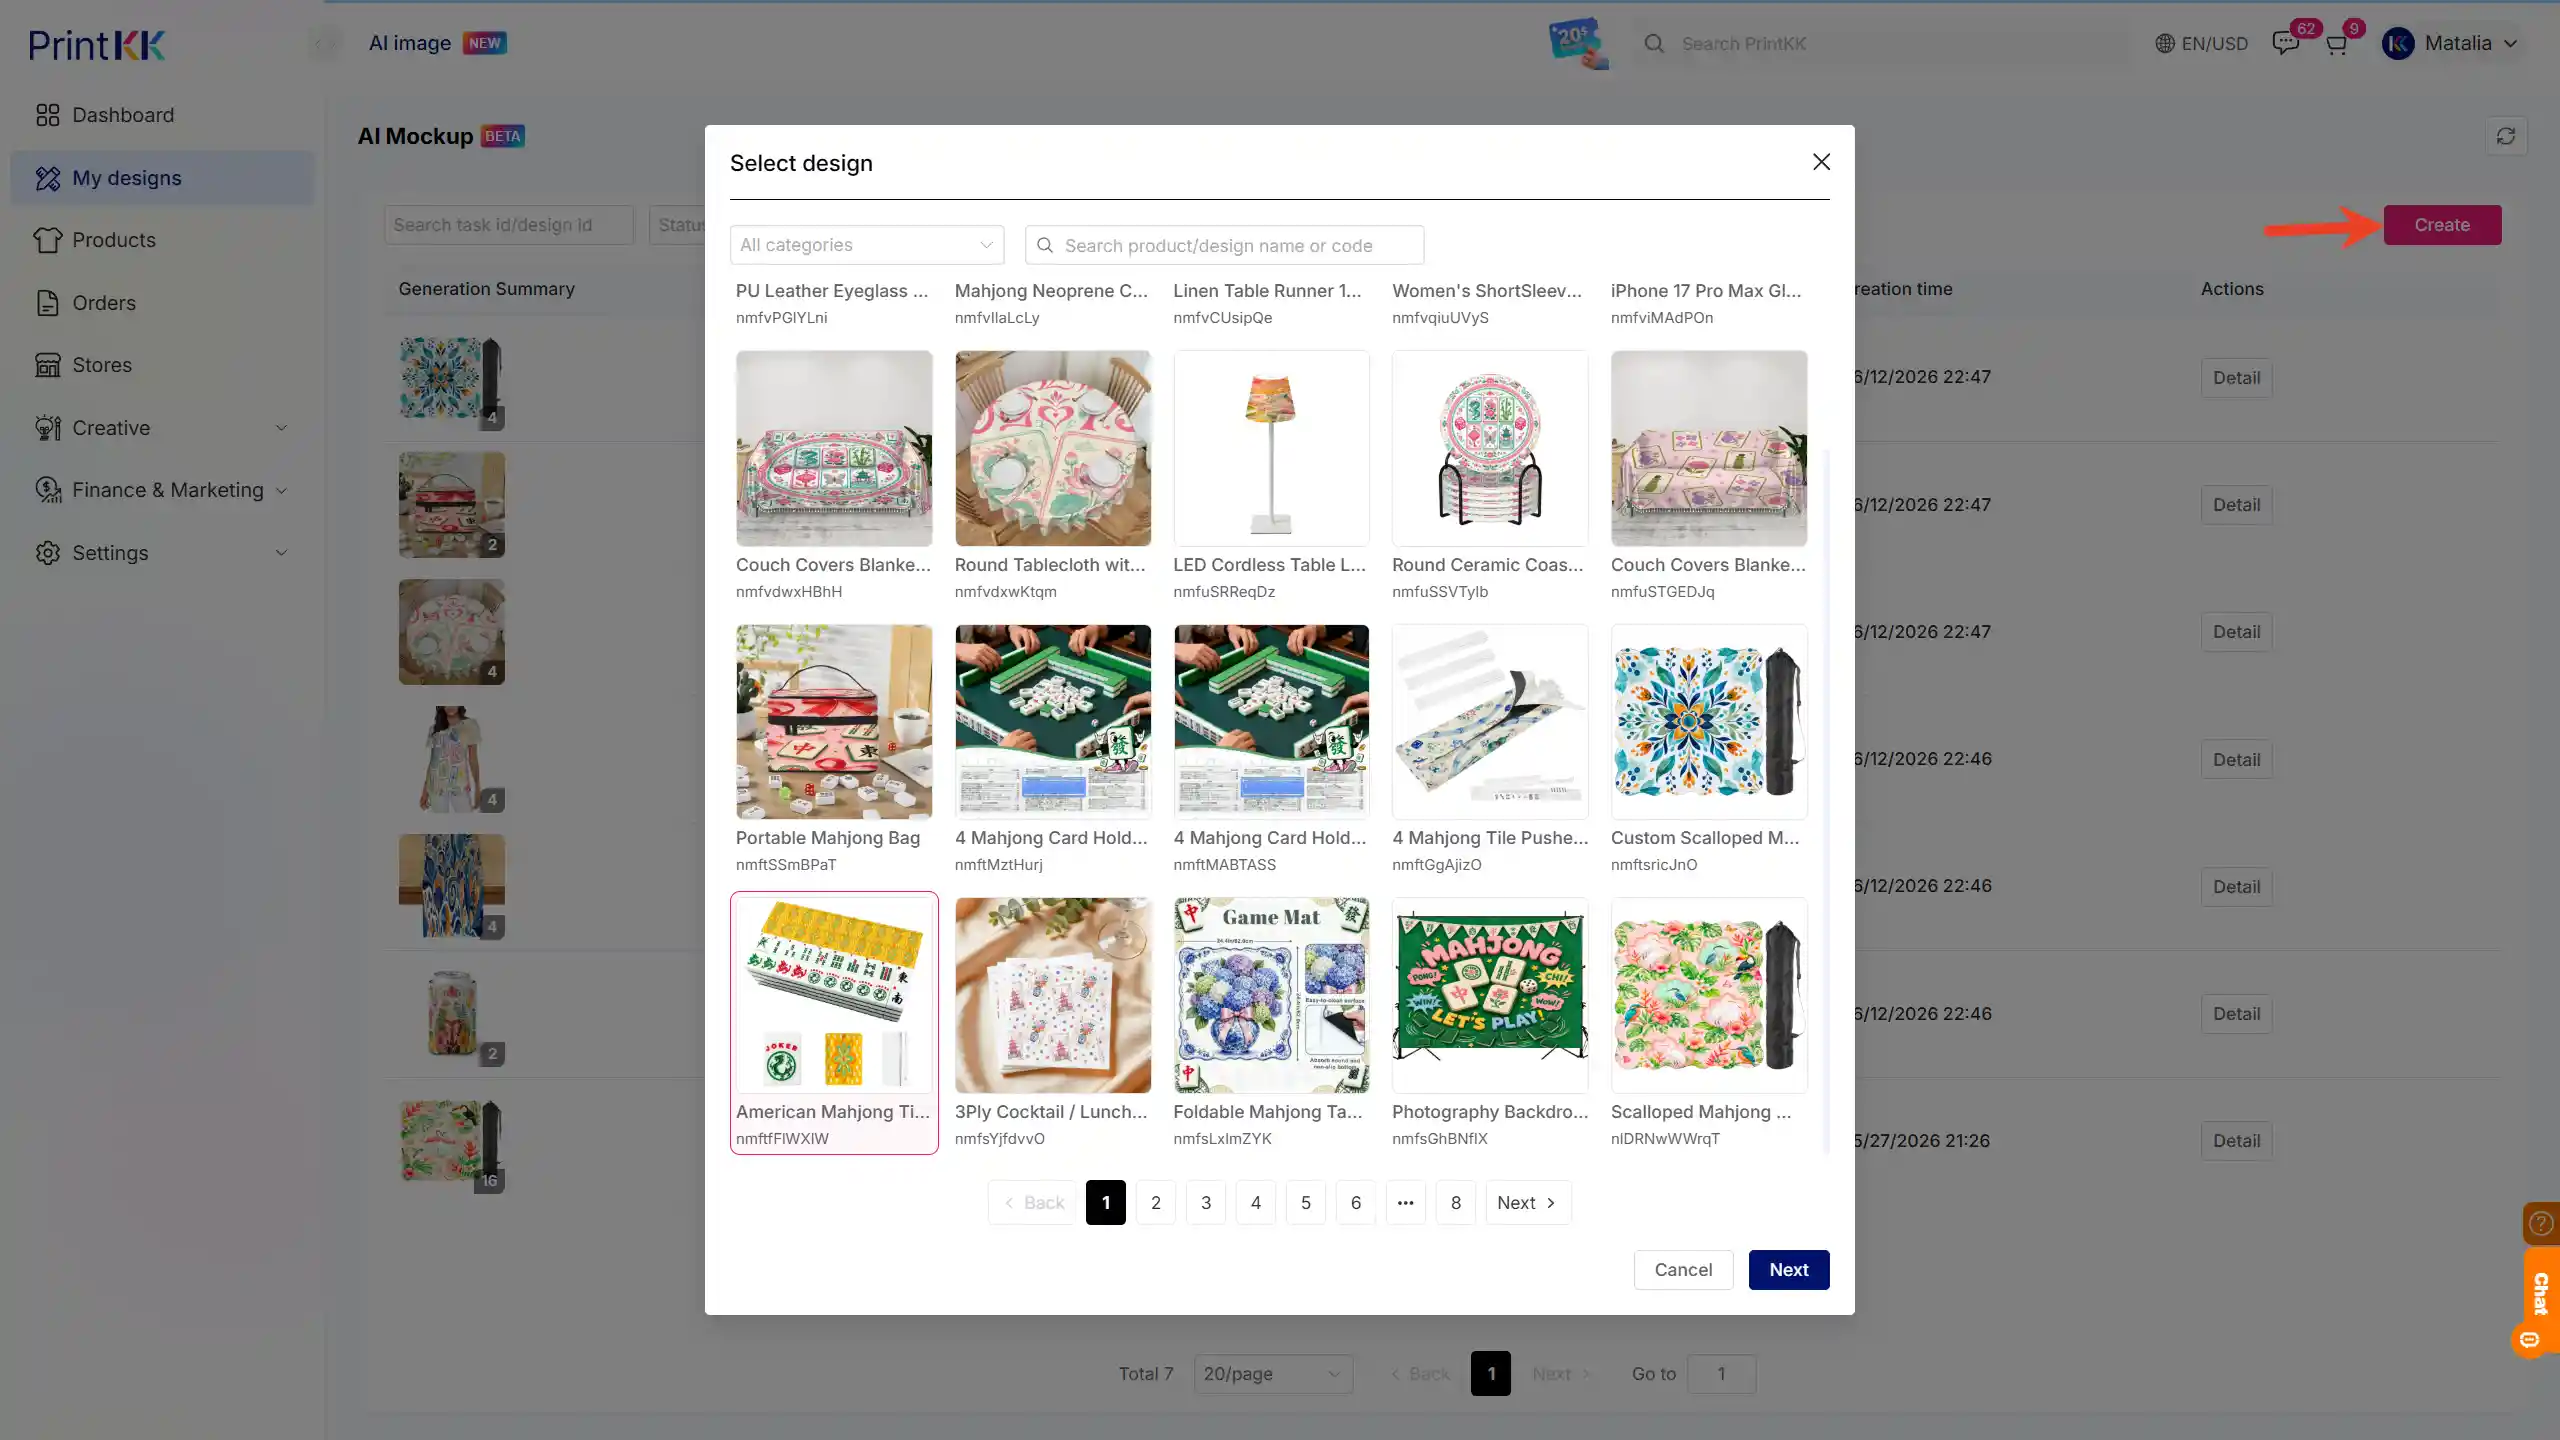
Click the Create button on the page to open the task creation drawer.
Step 1: Select design
Select the design you want to generate AI scene images for.
Currently, only single selection is supported. If it is a combined design, the system will display the combined designs as separate items.
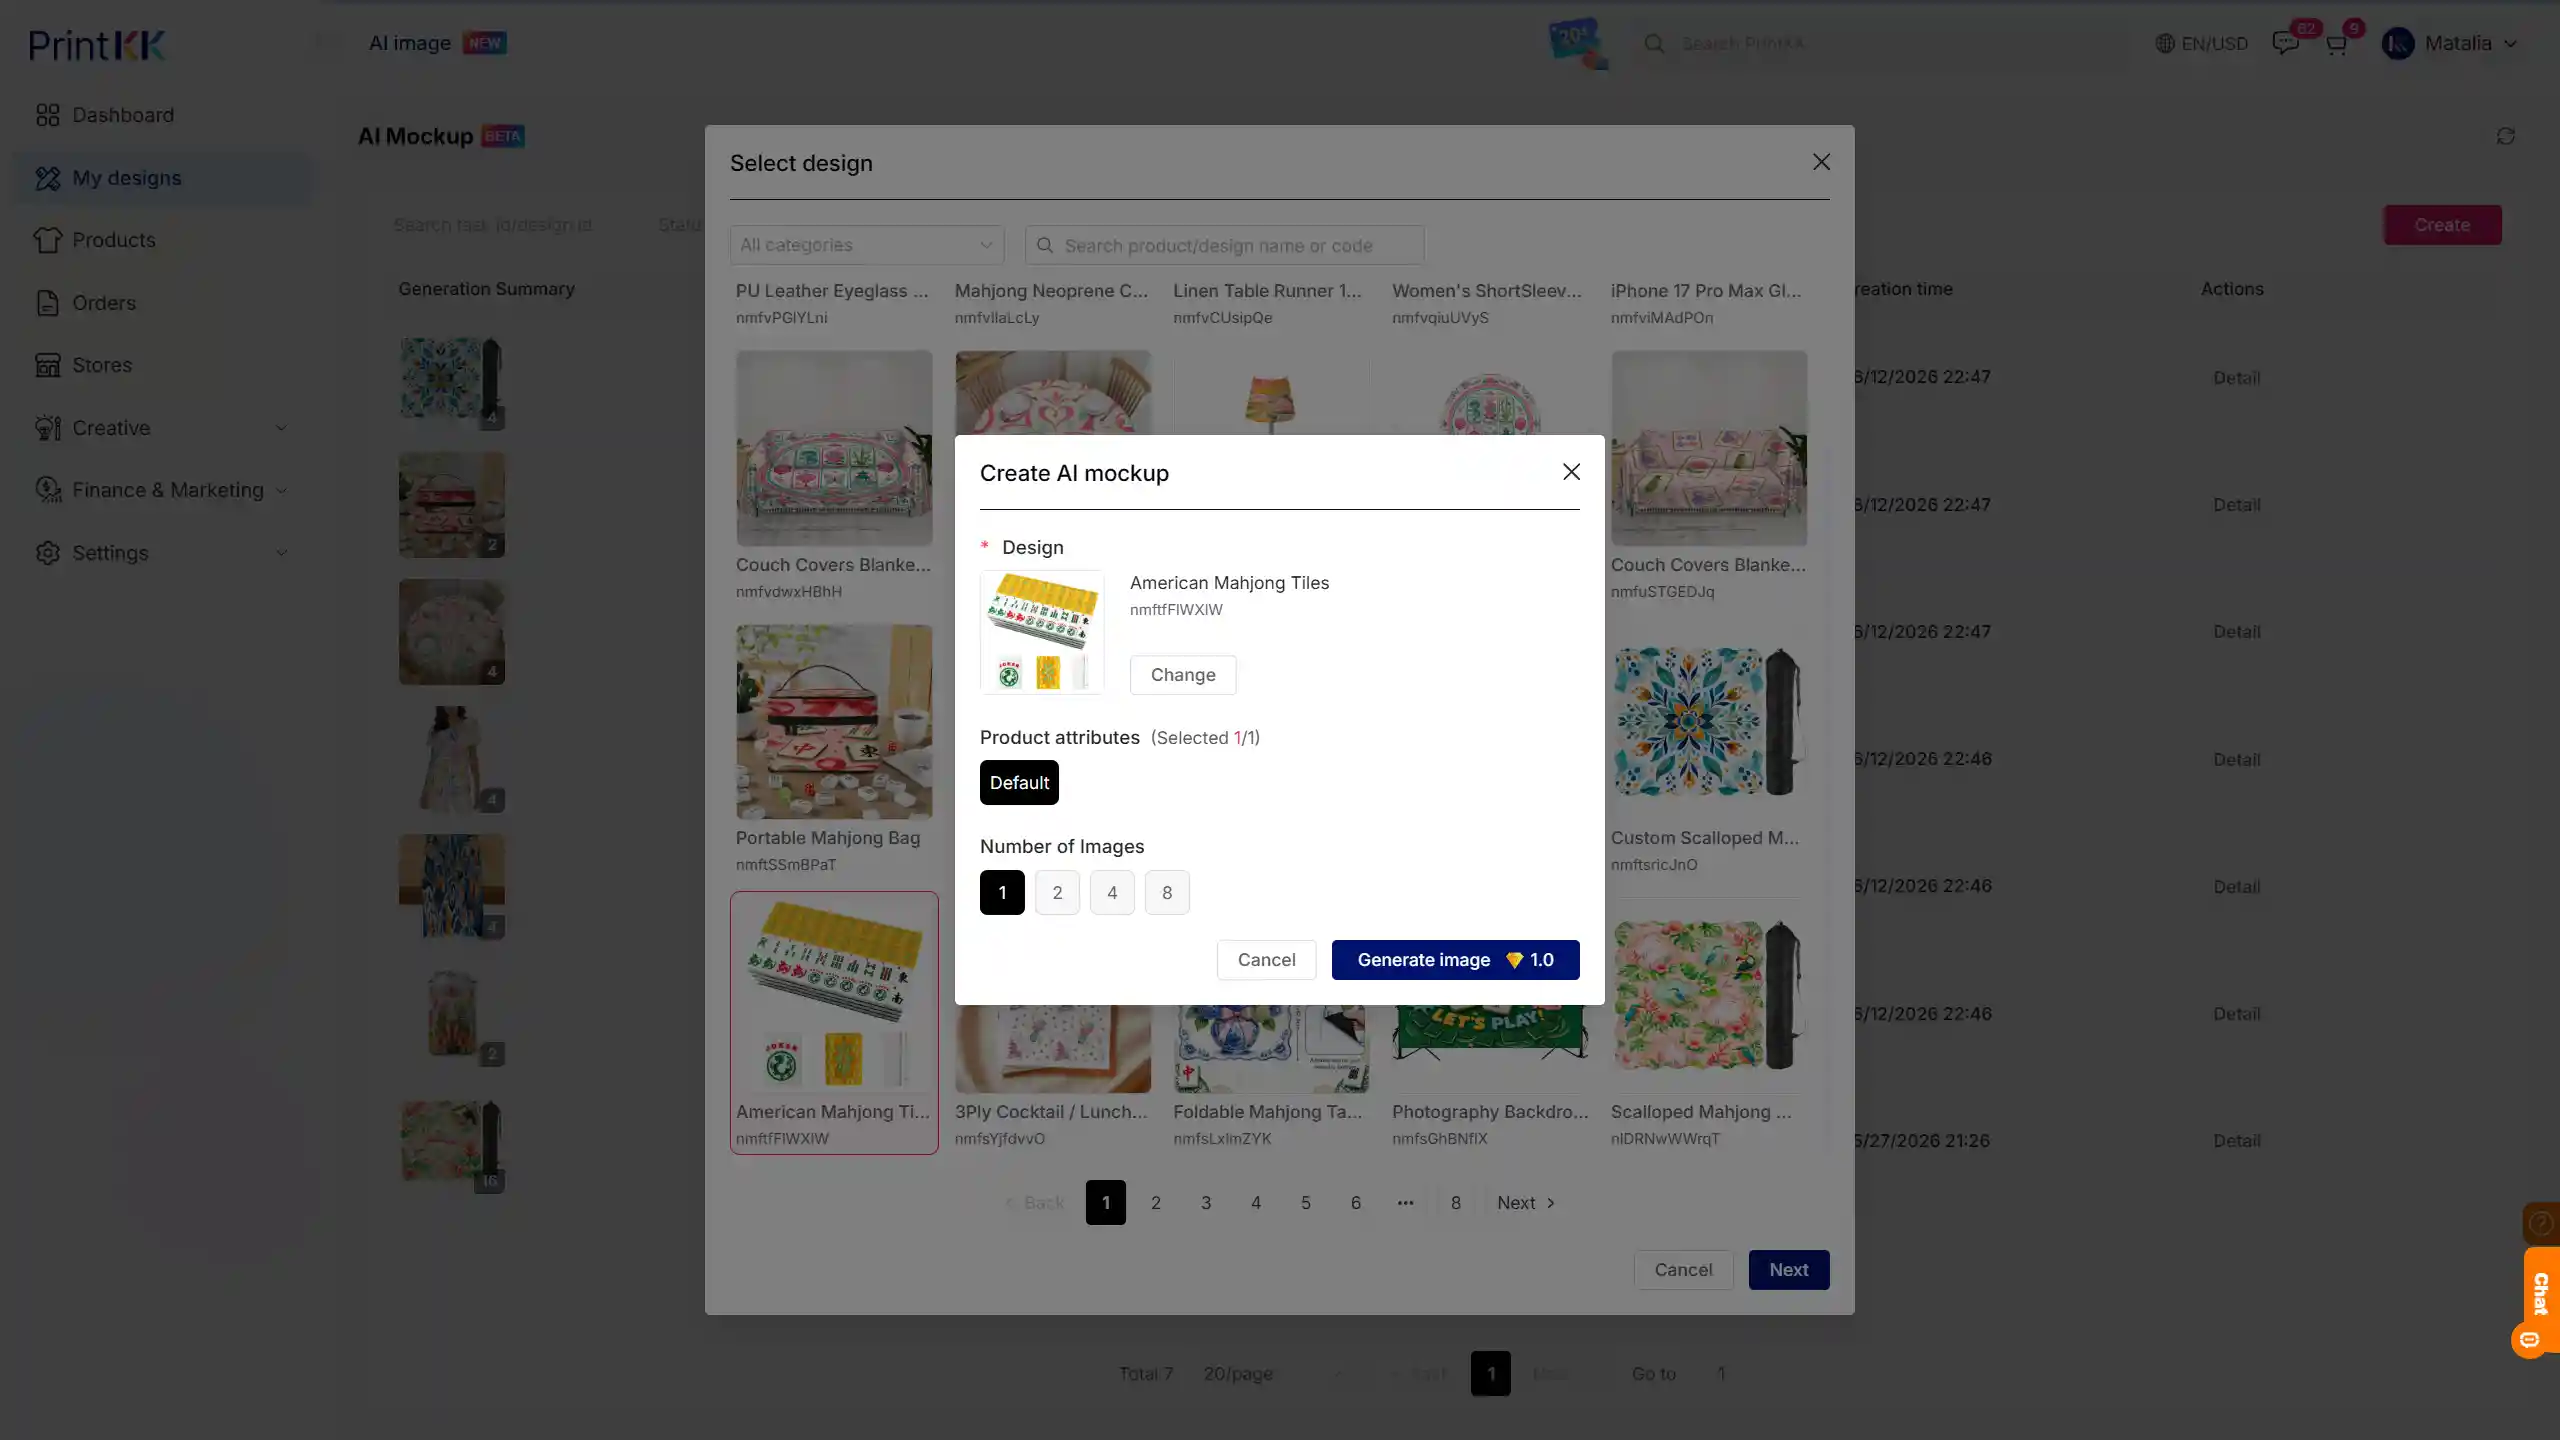
Step 2: Set Number of Images
Set the number of scene images you want to generate for each specification in Number of Images.
Step 3: Submit the task
Click Generate image to submit the task.
After the images are generated, the system will automatically bind the generated results to the same specification as the selected original image.
2.2 Track Progress and Results
After submitting a task, you do not need to stay on the current page and wait for generation to finish. You can check the generation progress and results in two ways.
Path A: View from the design perspective
Return to the My designs page and click the Mockup button on the right side of the design for the current product.
After opening Mockup library, you can view the generated images and choose whether to use them for product publishing.
Path B: View from the task perspective
Enter the AI Mockups task center and check the current task’s queuing, generation, and completion status in the task list.
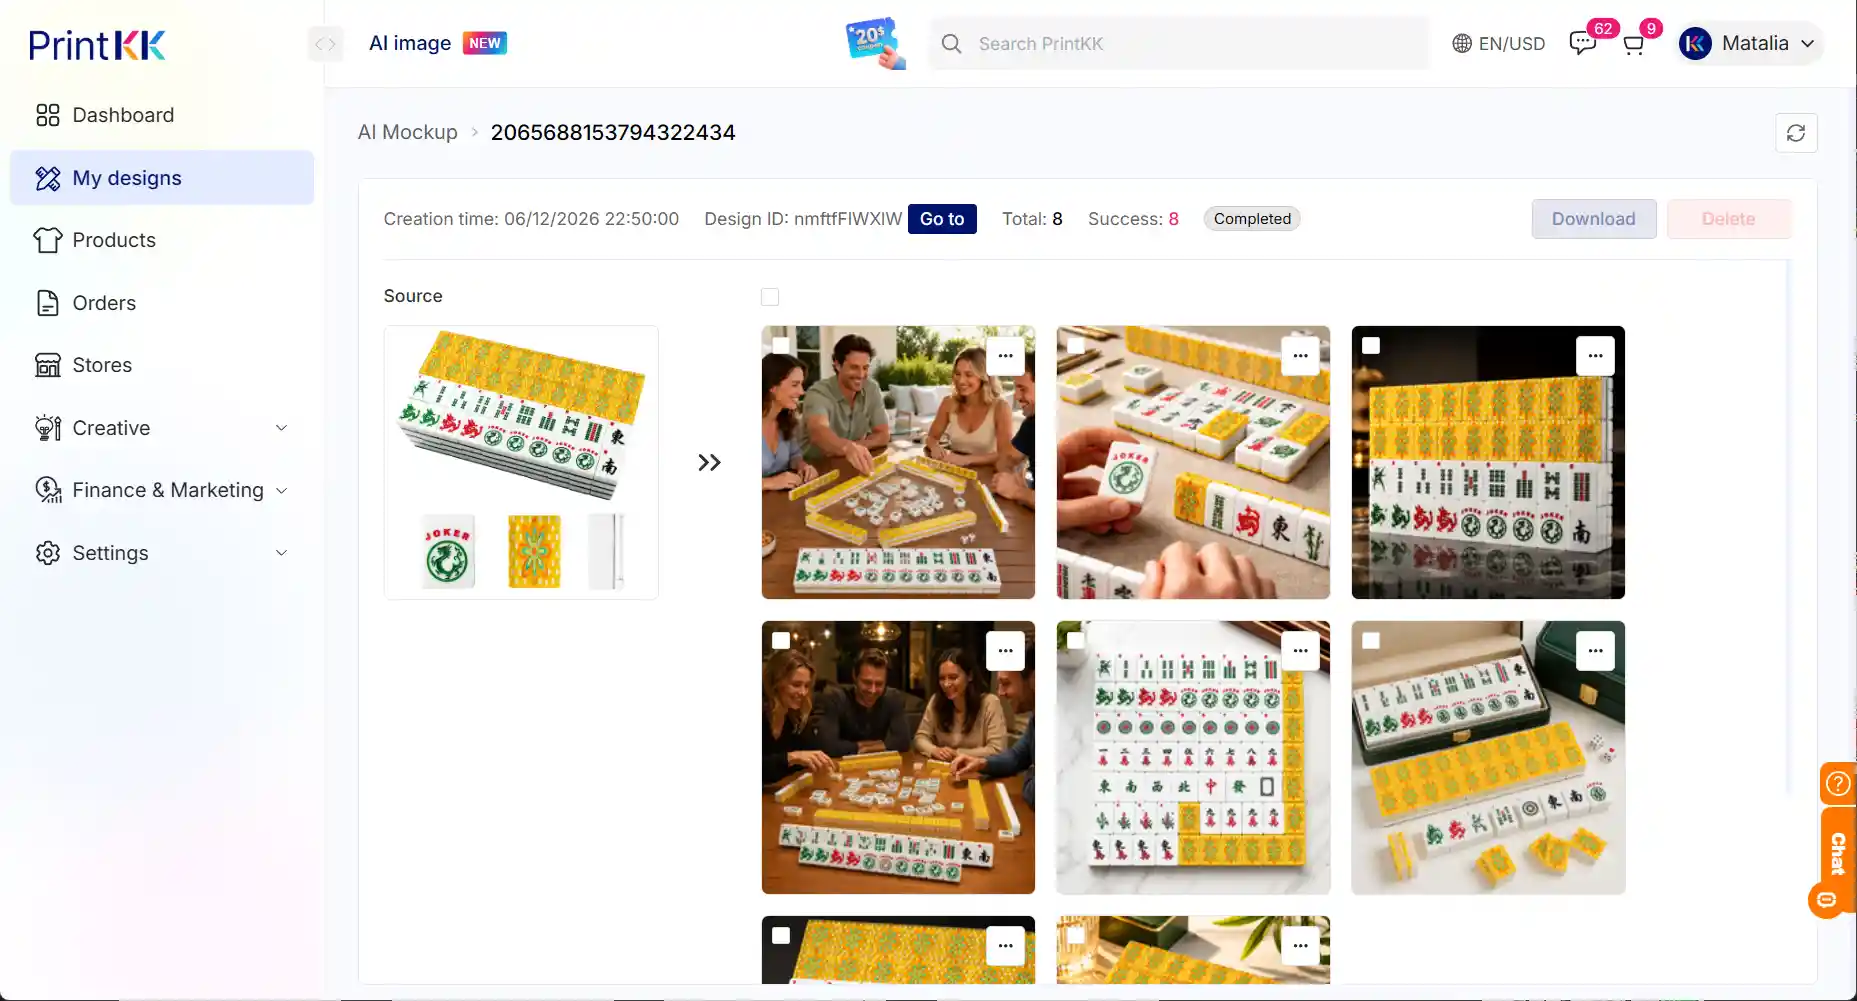
You can also click Detail to enter the task details page, view the results, or download generated images in batches.
2.3 Task Details Page: Detail
Click the Detail button in the task list to enter the task details page. The task details page displays the following information:
- Task ID
- Design ID
- Status
- Creation time
- Total
- Success
- Generating
- Failed
- Deleted
When the quantity of a status is 0, that status field will not be displayed.
Example: Total: 8 | Success: 2 | Generating: 6 | Failed: 1 | Deleted: 1
You can also perform the following actions on the details page.
Go to
Click Go to to jump back to the My designs page and automatically filter the current Design ID.
Add to mockup library
If an image has been deleted from Mockup library and you want to add it back, click Add to mockup library below the image to add the generated image to the Mockup library of that design.
3. Mockup Library
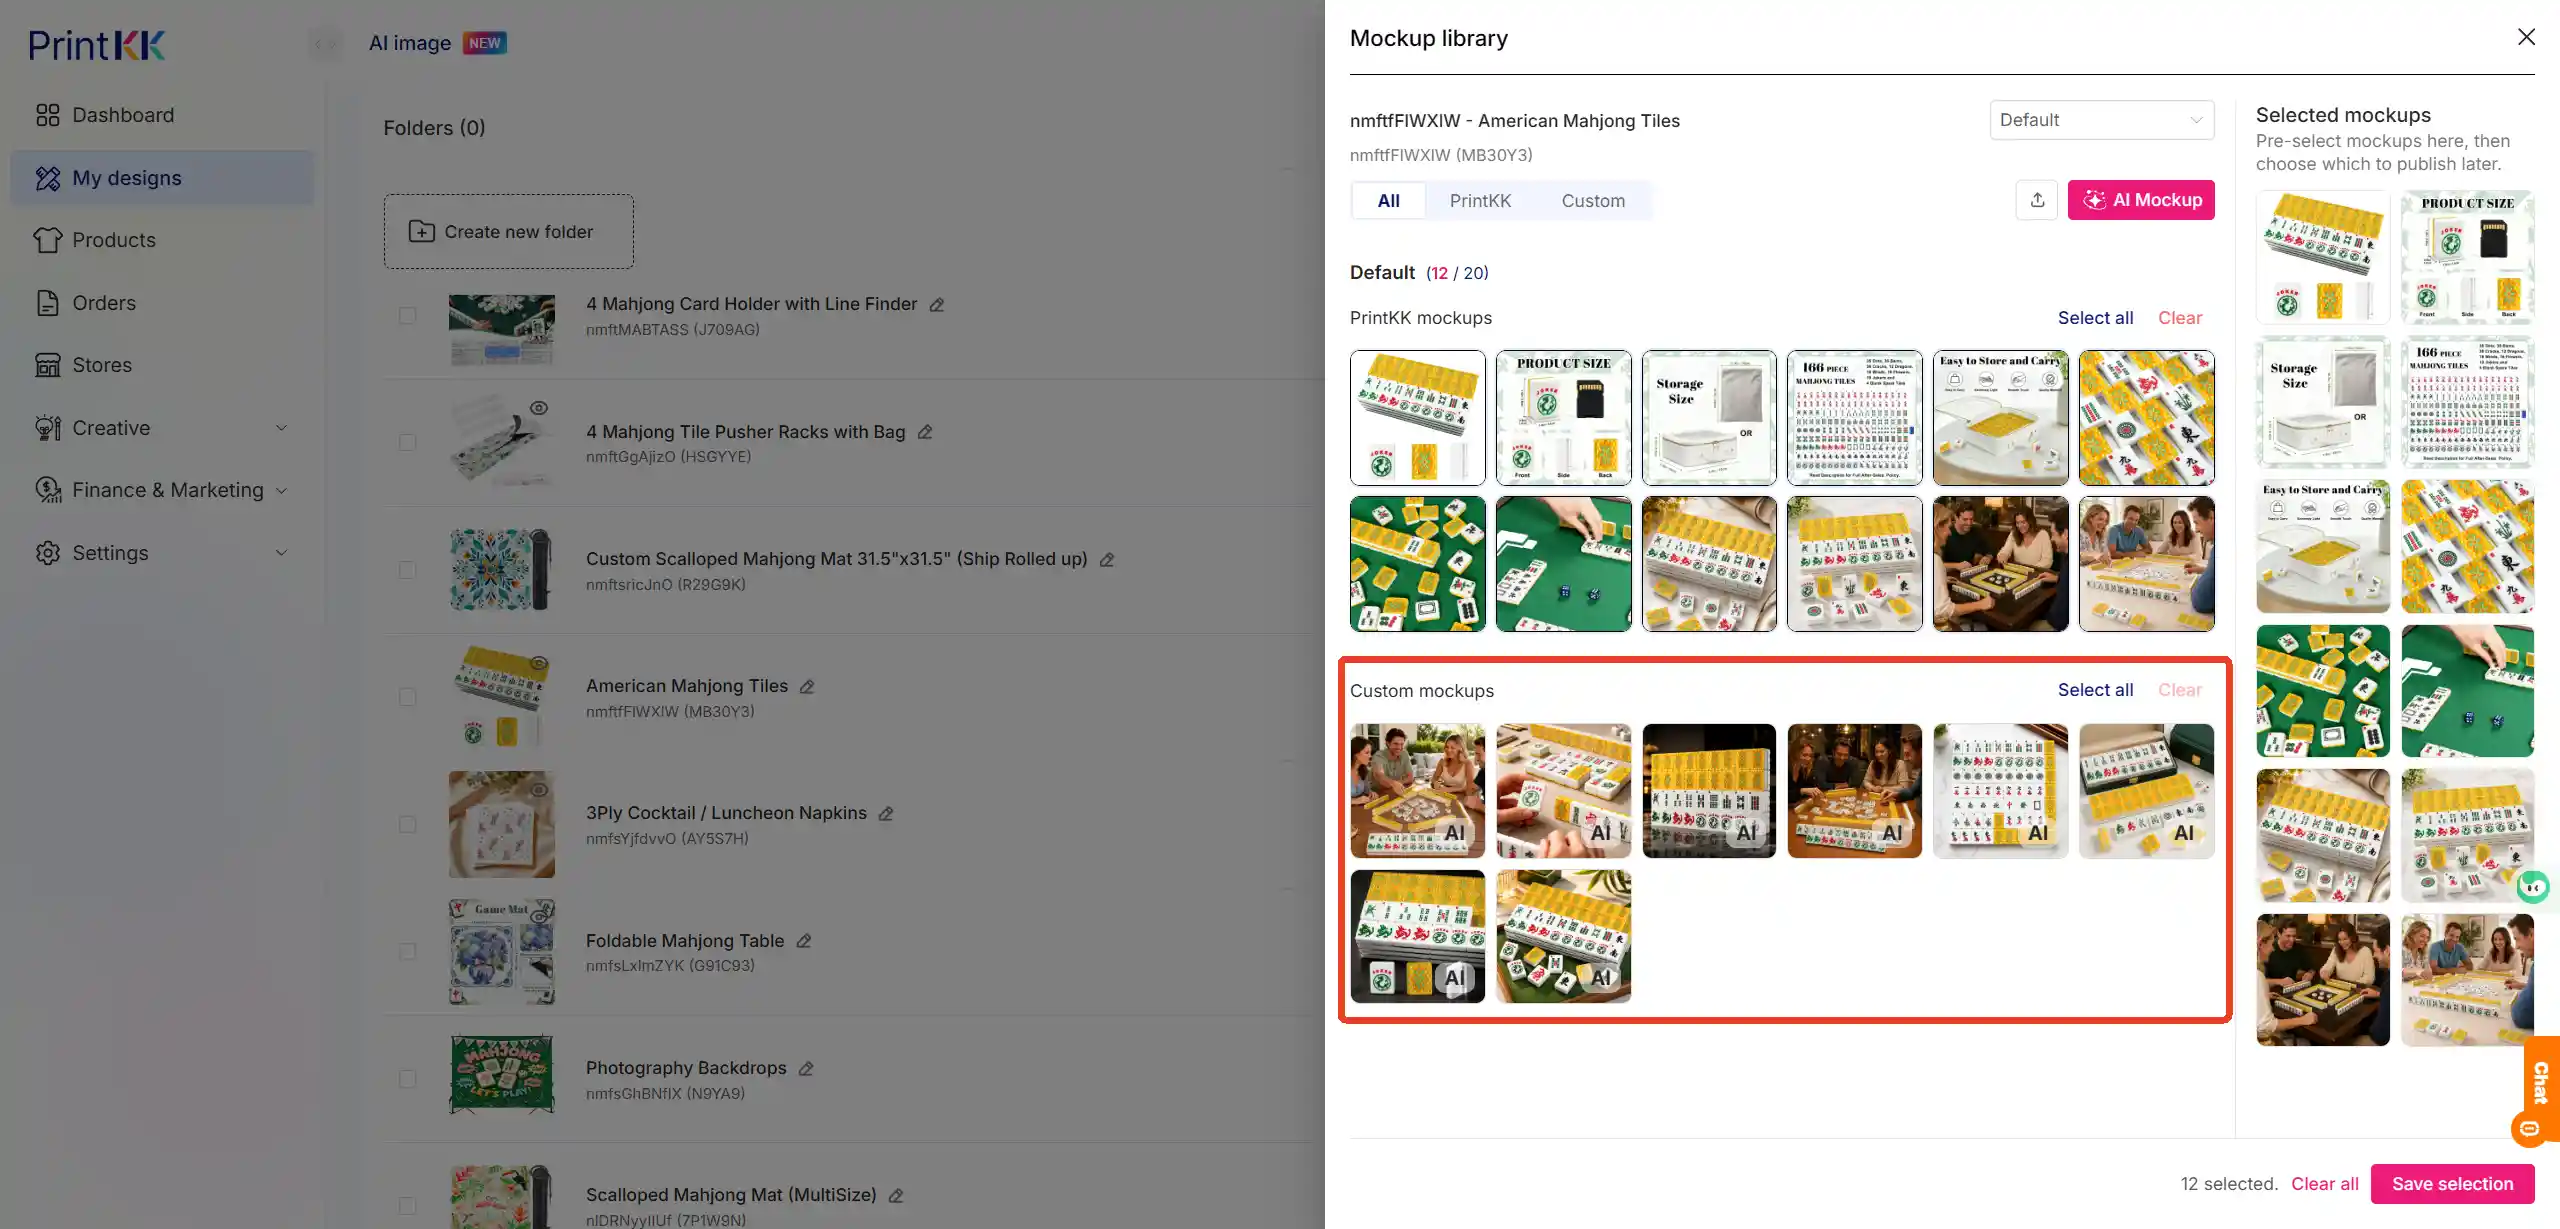
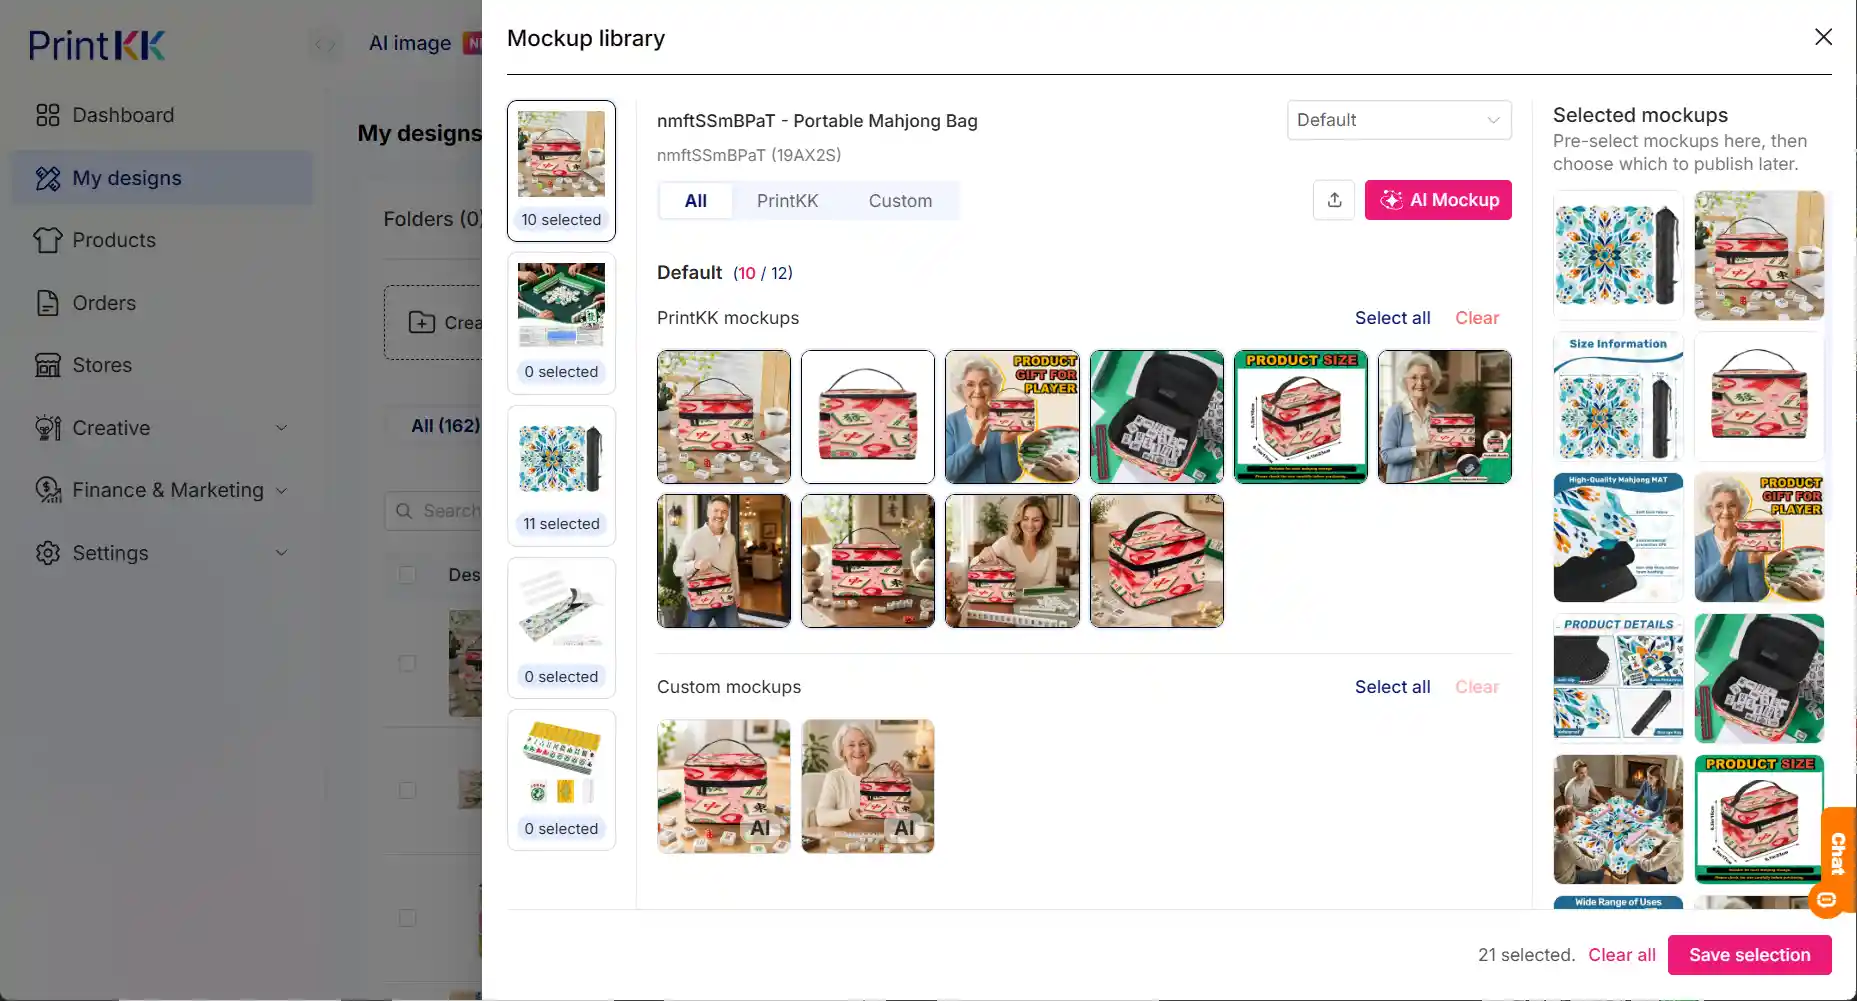
On the My designs page, click the Mockup button for a design to open the Mockup library drawer.
Mockup library is the core place to manage all image assets for the product.
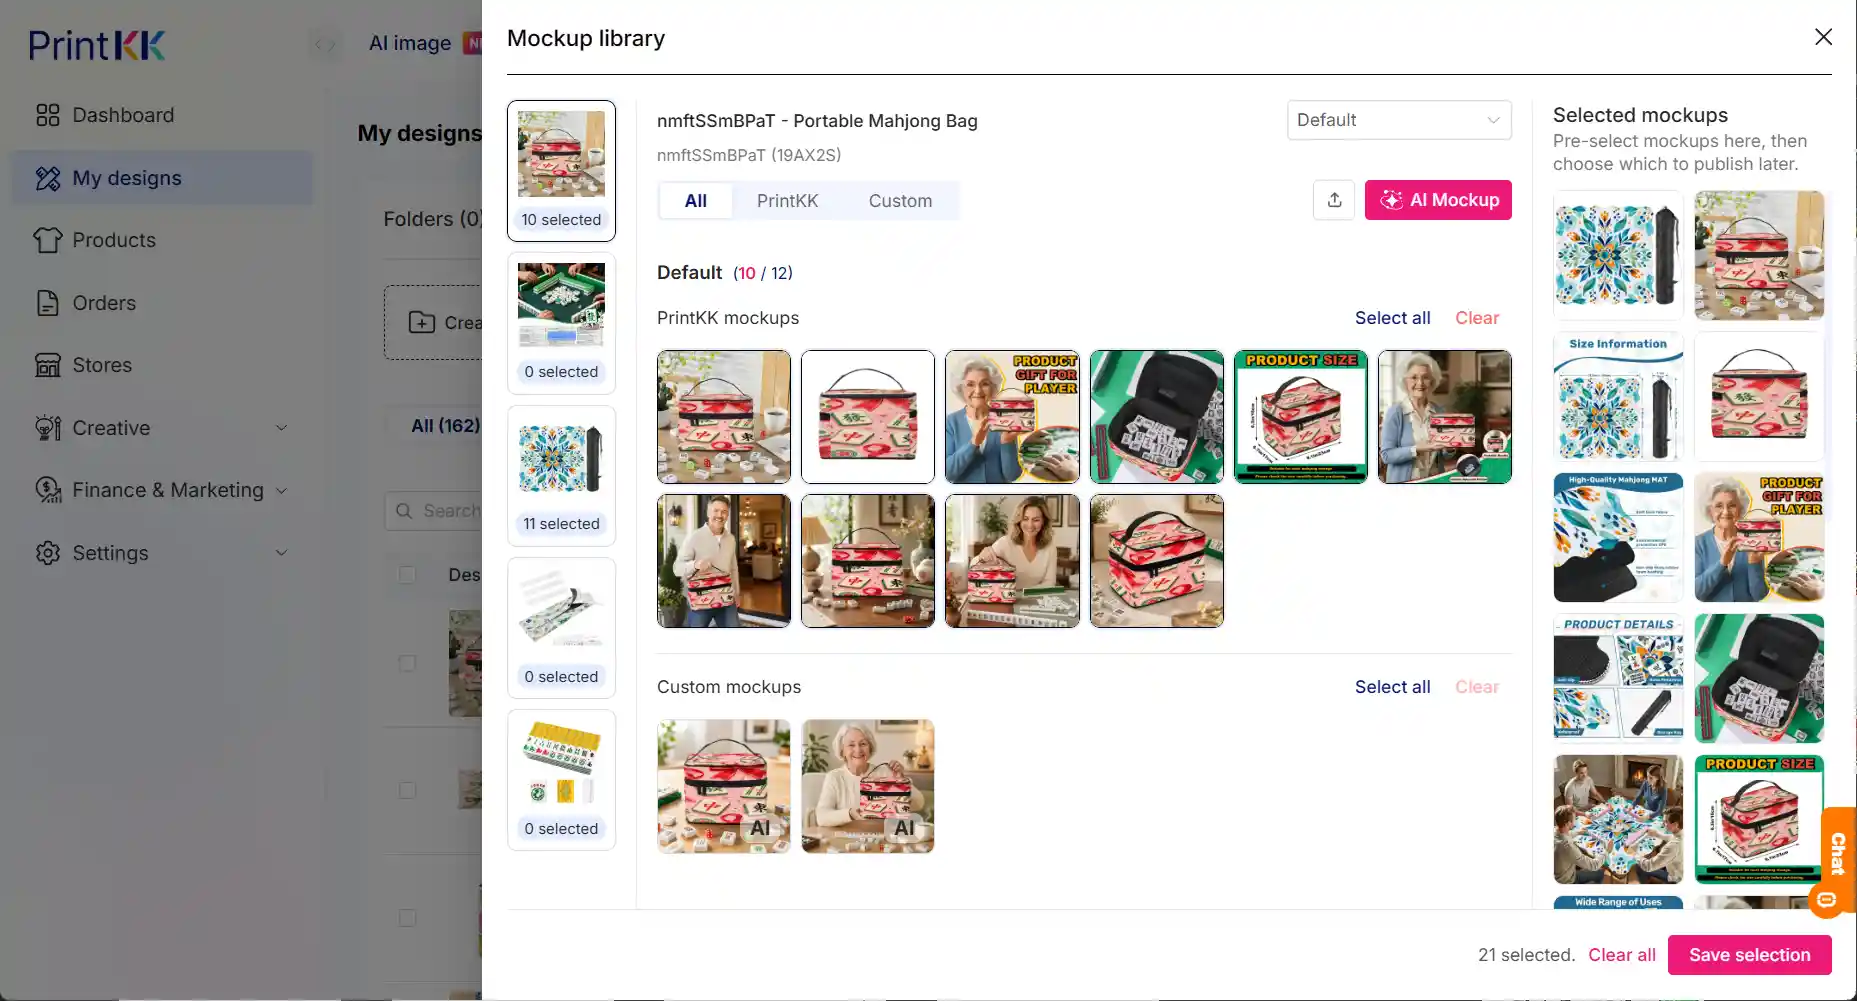
3.1 Left Area: Design Switching
If the current product is a combined product, the design card switching area will be displayed on the left.
This area displays:
● The default main image of the design
● The number of selected images for the current design
You can quickly switch and adjust between different designs.
If the current product is not a combined product, this area will be automatically hidden.
3.2 Middle Area: Asset Classification and Filtering
The middle area is used to view, filter, and manage image assets.
Tab Switching
The top supports the following tabs:
● All
● PrintKK
● Custom
By default, All is displayed.
Specification Filtering
The specification filter is displayed as All attributes.
Below it, the current design name and product code will be displayed.
Image Grouping
Images are grouped by color or specification.
Under each color or specification, images are divided into two areas:
PrintKK mockups
PrintKK mockups are product renderings automatically generated by the system designer.
Custom mockups
Custom mockups include images uploaded by users and images generated by the AI scene image tool.
AI-generated images will have an AI badge.
Both areas support:
● Select all
● Clear
● Displaying the number of selected images / total images under the current specification
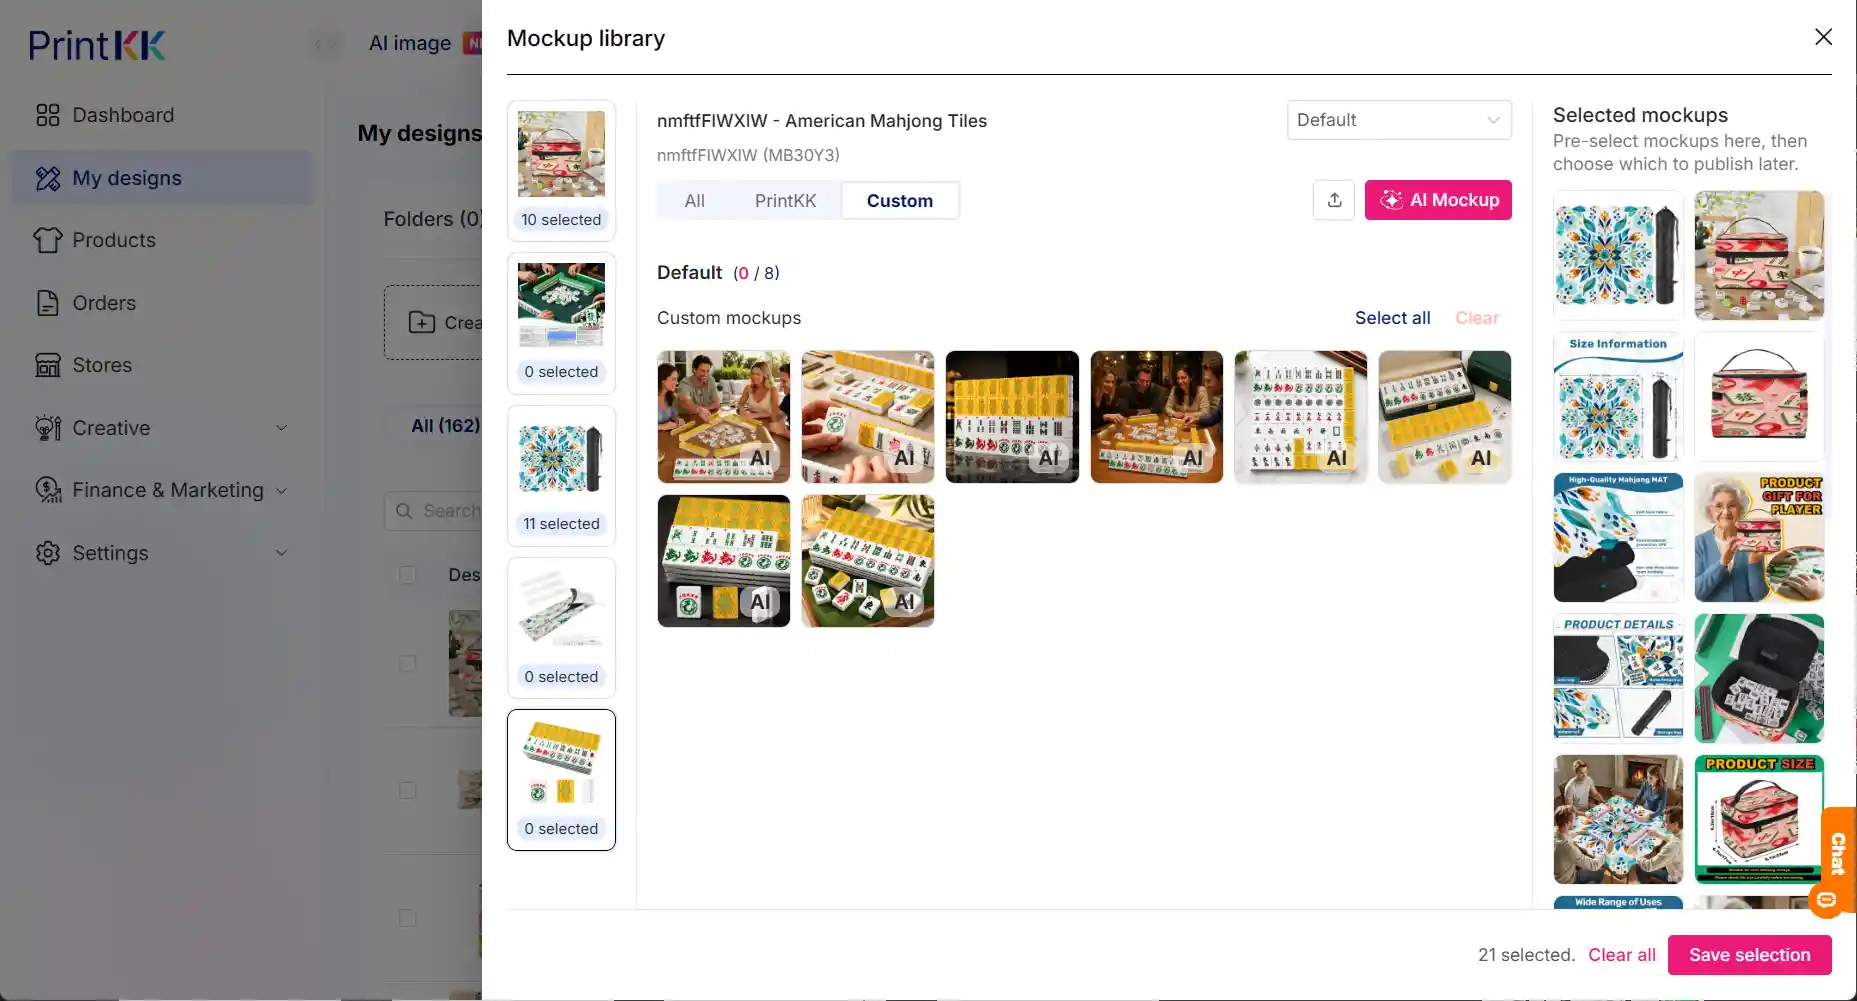
3.3 Right Area: Selected mockups and Sorting
The right area displays the currently selected images.
Drag and Reorder
You can directly drag images to adjust their display order.
Selected Quantity
The top displays the number of selected images in real time, for example:
8 selected
When saving, the number of selected images must be ≥ 1.
Clear all
Click Clear all to clear all currently selected images.
Save selection
After making adjustments, click Save selection to save the current selection and order, and close the drawer.
4. Upload Custom Mockups
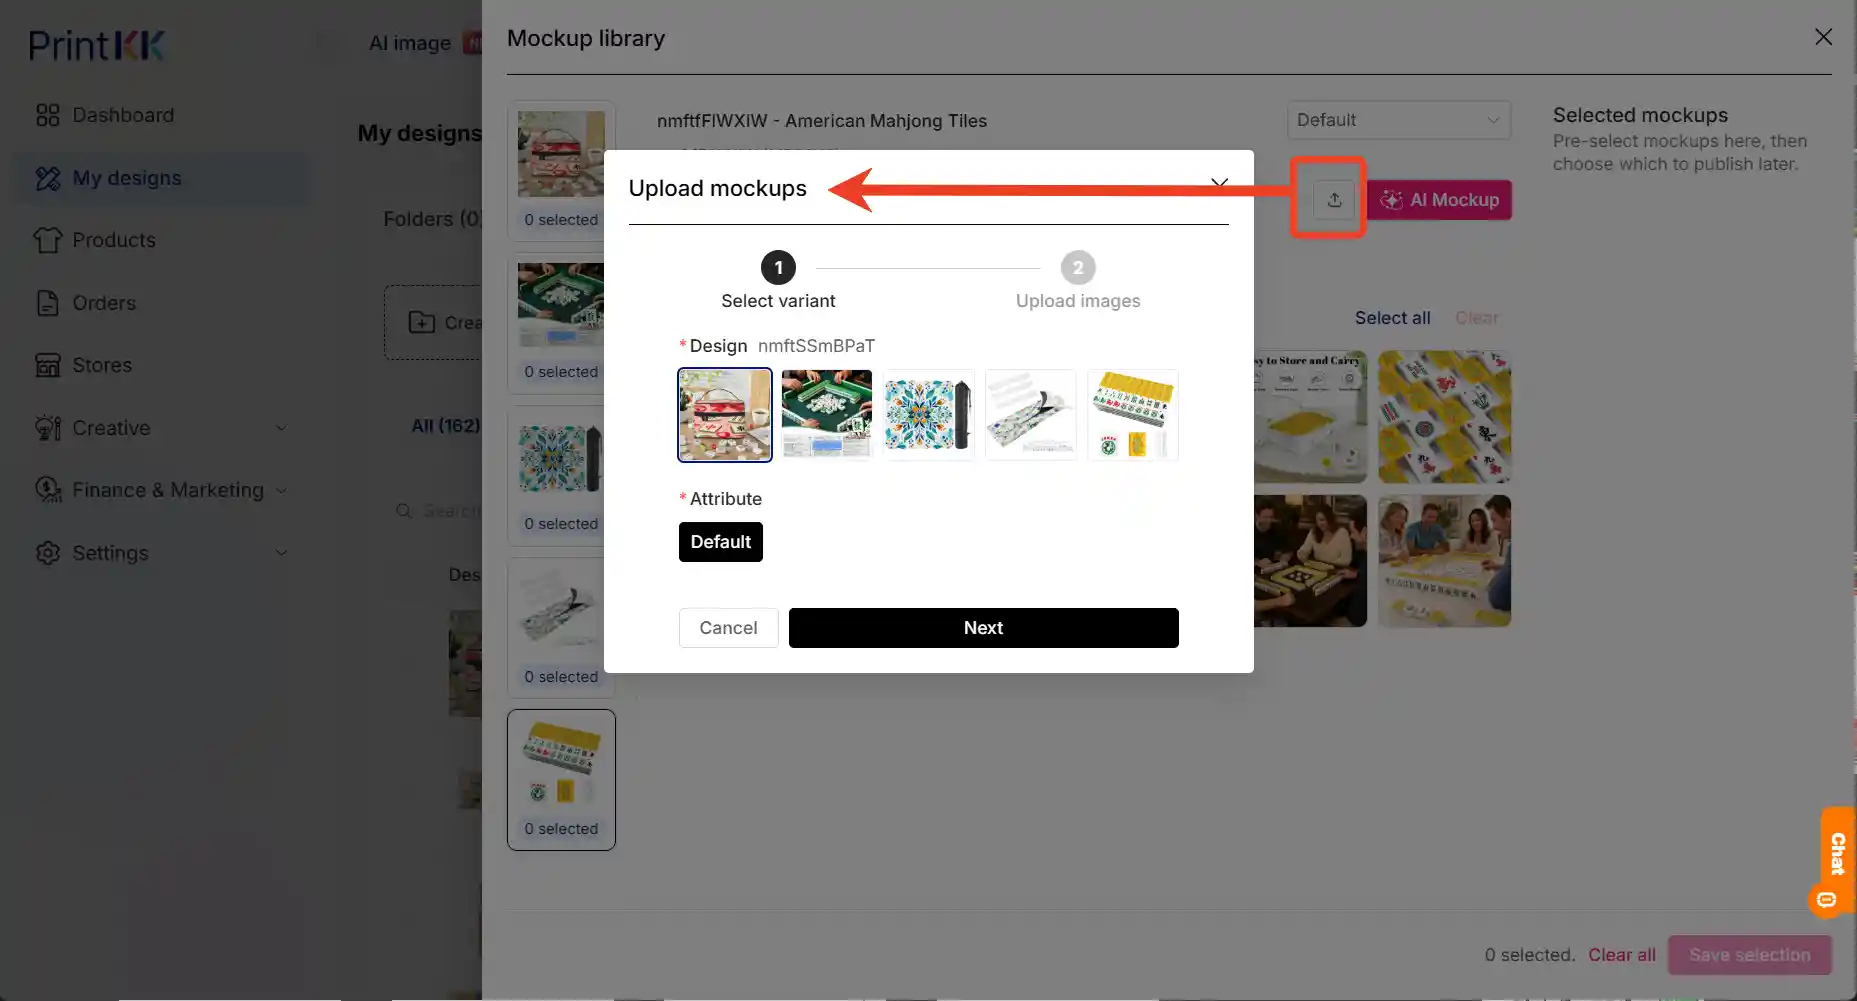
If you have your own real product photos or external rendered images, you can click the Upload images button at the top of the middle area to upload them to Mockup library.
Uploading is divided into two steps.
Step 1: Select variant
In the first step, you need to select the design and specification that the uploaded images will be associated with.
Design
If it is a combined product, multiple design images will be displayed. The parent design is placed first and selected by default.
If it is a non-combined product, only one design image will be displayed and selected by default.
Attribute
Select the corresponding color or specification.
If the specification has a color value, a color swatch will be displayed, and the specification name will be shown when hovering over it. If there is no specification, Default will be displayed by default.
Click Next to proceed to the next step.
Note: If the current product is a non-combined product with only one specification, the system will automatically skip Step 1 and go directly to Step 2.
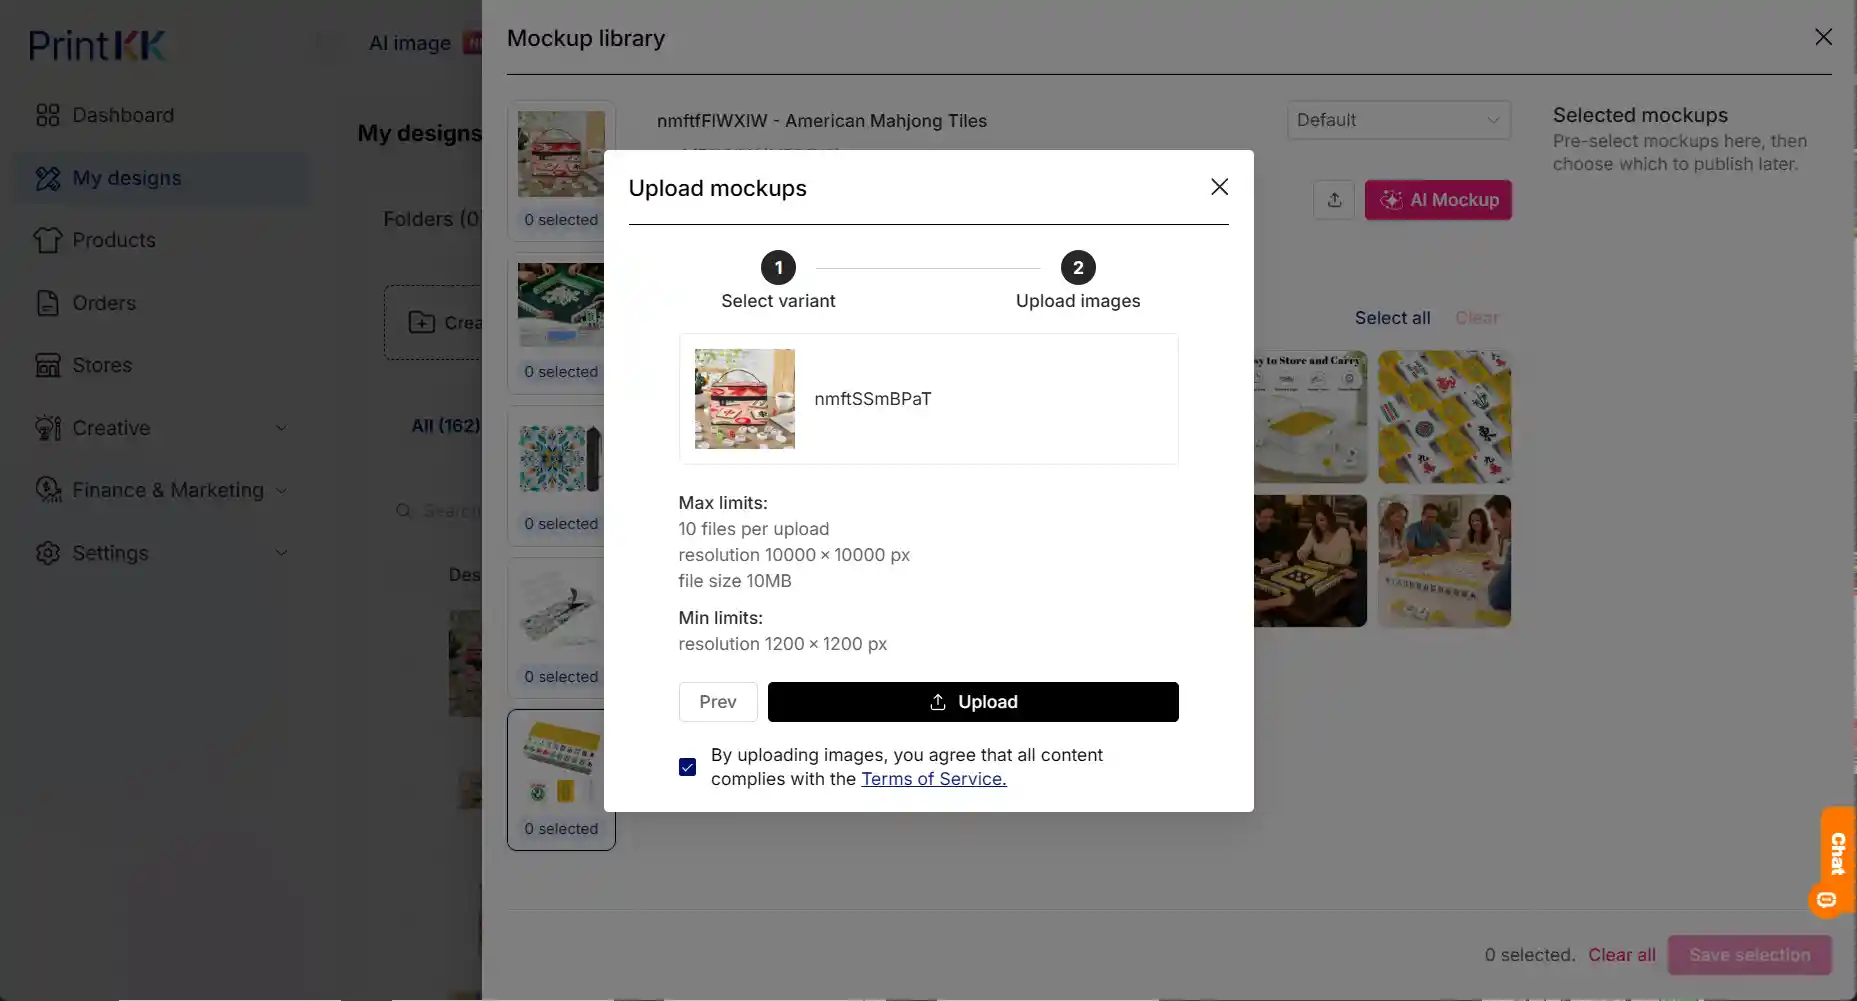
Step 2: Upload images
The second step is used to select and upload images.
The top of the page will display the design image, design code, and variant name selected in Step 1.
Upload limits are as follows:
Click Upload to select and upload files.
Note: Images uploaded through Mockup library are independent image assets and will not appear in My image.
5.1 Delete Images from Custom mockups
Delete an image from the Custom mockups area.
Note: AI images in Mockup library and the original AI images in My space are two independent sets of data. Deleting an AI image from Mockup library will not affect the image in My space.
5.2 Image Changes After Redesign
After you redesign and save a design in the designer:
6. How Does the Publish Page Use Mockup Images?
On the Publish page, the system will automatically load the images saved in Selected mockups on the right side of Mockup library.
The images will be displayed in the order saved by dragging in Mockup library.
6.1 Modify Images on the Publish Page
A Mockup library button will be added to the Publish page.
Click this button to directly open Mockup library and reselect or adjust product images.
6.2 Image Rules for Drafts
If the product information has already been saved as a draft, and you later adjust the selected images or order in Mockup library, the system will process it according to the following rules:
Case A: Publish directly without re-entering the Publish page
The system will use the old image records already saved in the draft.
Case B: Re-enter the Publish page
The page will read the latest saved images and order from Mockup library.
11. FAQ
Q1: Should I choose an official template or create my own template the first time I use AI Workflow?
We recommend choosing Official template for your first use. After you complete the full process, you can create your own custom template.
Q2: Why does my task show Pending review?
This means a node has Require review enabled, and you need to review the generated results. Click the task to enter the details page, then choose Approve or Delete.
Q3: Can deleted images be recovered?
No. Please confirm that you no longer need the result before deleting it.
Q4: Can a task be restarted after Stop?
No. After a task is Stop, it cannot be recovered, and used Tokens cannot be refunded.
Q5: Why can't I select some products?
If the workflow includes the Generate mockup node, the system will only display products that support AI product scene or mockup generation.
If a product does not support AI product scene or mockup generation, it will not appear in the selectable product list.
Q6: Where are approved results saved?
Images will be saved to My space. Product designs will be saved to My design. AI product scene images or mockups will be saved to My space and synced to the Mockup library in My design.
Q7: Will images uploaded in Mockup library or AI scene images take up space in My image?
No. Images uploaded in Mockup library are independently managed for the current design and will not appear in My image.
AI scene images will be saved in My space, and the data in My space and Mockup library is independent. Deleting data from one place will not delete the other.
Q8: Why can’t I select a specific product in the Product area?
If the AI workflow or task includes the Generate mockup node, the system will automatically filter products that support AI scene image or mockup generation. Unsupported products will be automatically hidden.
Q9: Will my uploaded Custom images be deleted after redesigning?
No. Redesigning only updates the system-generated PrintKK mockups and clears the previous selections in Selected mockups on the right.
Images uploaded in Custom mockups and AI scene images will remain.
Q10: Has the Download mockup page changed?
No. The Download mockup page still only displays and supports downloading official product renderings generated by the PrintKK designer.
User-uploaded Custom images and AI scene images will not appear on the Download mockup page.